Tsavo Highway

“Agh…what happened?”
“Chief, please respond; what is your status? Over.” [Tsavo Highway, Halo 3]
Come on, Miranda – the Chief has never spoken outside of a cutscene! And since Cortana’s not here to answer for him like normal…
“If you can hear me, find transport. Head for the town of Voi.” [Tsavo Highway, Halo 3]
There you go – providing a way for the Chief to “answer” without having to speak.
Tsavo Highway opens up in an extremely dark basement, with a fire burning nearby, and wreckage strewn about. The Arbiter is absent from this level, having escaped the Crow’s Nest via another route. The Chief and a small amount marines are at the bottom of the Crow’s Nest’s elevator shaft, all having avoided death by escaping before the bomb went off, in the mountain far above. Confusion is the primary emotion among the marines at this moment; their base has just been destroyed, they’re sitting in near-darkness, and groans of pain can be heard around the room.
“Settle down, marines. Somebody hit the emergency power!”
“On it, Sargeant.”
“Anyone from Charlie Two? I got separated.”
“Nah, man. Alpha Six. They’re all gone, too.” [Tsavo Highway, Halo 3]
These poor marines. I guess some of them might have already been down here, or maybe they arrived at the Crow’s Nest just in time to get shuffled to the elevator. Some of them were injured in the descent (or the subsequent explosion), and if you walk up to the medic (who, if you’ll look closely, is missing the graphic of the data pad that he’s punching numbers into!) and the wounded marine, you can hear an exchange:

“Agh! I’ve got a broken rib.”
“Hey, you wanna bleed out?”
“No…”
“Then I’ve gotta keep pressure on the wound.” [Tsavo Highway, Halo 3]
Moving into the next room, Sargeant Reynolds speaks up, telling all of the marines to “set [their] boots on the line,” which they promptly do.
I’m still amazed at how far we’ve come with videogames; the moment you get into the Warthog, the music changes slightly and gains a bit more momentum. The marines that don’t make it into the ‘hog with you pile into the long-awaited Troop Hog. The typical Halo dialogue starts here; your marines all begin to talk at once as soon as you hop into your ‘hog, and they are released from their scripted movement.
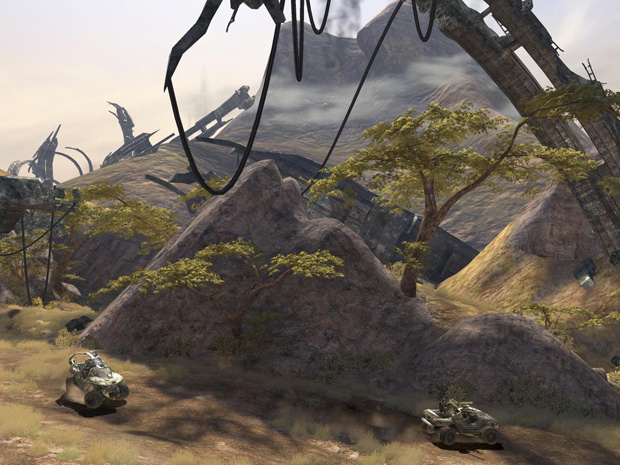
The first encounter you have with enemies on this level is short, but satisfying. You see, up ahead, in the cave, a group of Jackals and Grunts doing battle with a few marines near a small structure. Your marines are quick to point out the enemies. The small group of Covenant never see you coming, and your gunner cleans up the few that you don’t splatter.
By this time, the music has morphed into a recognizably-Halo theme, which I believe was first heard during Outskirts in Halo 2, during the battle with the Hunters and continuing into Sniper Alley.
The rocky, almost pitch-black interior of the cave makes the emergence from it a memorable one – light streams down onto the plains in front of you, highlighting the debris of both Covenant and human structures.
Immediately after emerging from the cave, if you look to your right, you will find an almost-unrecognizable pile of debris, known to be Covenant only by its purple color. If you move close, you can hear a snippet of dialogue being transmitted by a Brute leader located elsewhere:
“Chieftains, rally your packs! Kill all survivors! Let none near the crater. The Prophet will soon complete his blessed task.” [Tsavo Highway, Halo 3]
In fact, many piles of what I assume to be downed Phantoms are located in this level, and a few of them will offer transmissions like this one; some are longer in length than others.
Up ahead, you run into another group of enemies. While a Brute commands them, they are no match for your ‘hog. I find it interesting that Bungie decided, in this level, to bring you slowly into battle as opposed to thrusting you suddenly into a massive firefight. I think that it works well, since you develop a feeling of superiority in your Warthog – a feeling that will soon change.
Instead of taking a right here, continue on ahead, to the left of the battle you were just engaged into. As you approach the cliffside, some dialogue will start among your marines.

“Mombassa Space Elevator.”
“It collapsed when the city got glassed.”
“But the tether was thousands of kilometers high!”
“Yeah. Well, now, it’s scattered all over the Savannah.”
“Holy crap.” [Tsavo Highway, Halo 3]
I, like many Halo fans, remember the space elevator debris being pointed out during the Announcement Trailer, and am glad that it was identified in-game. It adds a lot to the environment and many fans probably don’t even recognize what it is. While it is good for people to realize what they’re seeing all around them, I also like the fact that Bungie doesn’t force this knowledge upon you – you have to drive off of the normal path to be exposed to it.
You can also take a moment here to appreciate the audio in the game. Behind the music, you can hear the rustling wind, as well as the sound of the debris of the space elevator around you – metal straining to keep its shape after being placed in an unnatural position.
Passing back by the second Phantom debris (which has no audio transmission that I’ve heard), notice the plasma leaking from it. It looks a lot like fire that you would see coming from a human vehicle, except purple.
The feeling of ‘hog superiority continues as you come across two snipers; helpless against you and your marines – as long as you don’t slow down.
“Chief, still can’t get the Commander. COMs are a mess. Pelicans are scattered. Best thing now, get some distance between us and the base. Brutes are gonna be looking for survivors.” [Tsavo Highway, Halo 3]
Speaking of the base, take a look behind you.
You can see smoke emerging from the Crow’s Nest, located high up in the mountainside. The rectangle cut into the rock is presumably the hangar that you encounter twice in that level.
The first major encounter of the game occurs here. While it isn’t populated by tens of enemies, a Brute Chieftain with a Fuel Rod Cannon does pose a major threat. One or two direct hits, and your ‘hog, as well as you, will be out of the game. Two separate entrances to this encounter give you multiple ways of approaching it, as well as a route to drive your Warthog on, so that you don’t have to slow down or come to a stop, and get pounded by that Fuel Rod Cannon.

As soon as all of the enemies in this area have been disposed of, a transmission will begin in the downed Phantom, nearby.
“I see it, pack brothers! The holy relic! What fools… to have lived so long on hallowed ground… never knowing what lay beneath the surface.” [Tsavo Highway, Halo 3]
If you were to stick around for an even longer period of time, you might notice the Morse code being transmitted from the Phantom (what are Brutes doing using Morse code?). This is actually the same audio that was discovered during the Beta in the High Ground flag room, and later documented at HBO. The different phrases are:
- “Frogblast the ventcore”
- “sababwl” (an acronym for Xbox is “shiny and bumpy and bursting with love”)
- “Dont make us kick your ass”
And if you stick around for a really long time, then you get a really nice treat: a clip of Under Cover of Night from Halo 1 plays – this also occurred in the High Ground flag room in the Beta. We have a recording of the Tsavo Highway clip available here.
The next encounter you come to can be pretty tough. If you don’t take immediate cover behind the first rock on your left, then you will typically get taken out by either the Jackal snipers, the two turrets, or the Phantom hovering overhead. But before you can take cover, you have to eliminate the small platoon of enemies waiting for you. The Brute has a Brute Shot, and he’s not afraid to use it – and those things are excellent for knocking over vehicles.

This battle is a lot of fun to play, even with the insanely accurate snipers. They give you enough time to take them out if know where they’re at, so it ends up being pretty enjoyable – you take out the small group of enemies by the rock, then you pick off the snipers and maybe knock out one of the turrets, and finally, you’re able to hop back in your ‘hog and move out to take down the rest of the enemies.
The small lakebed is capped off by a little dam; notice the rust that has stained the ground beneath the pipes. And the waterway that follows the dam is a nice way to guide you into the next encounter without looking like a normal “this way!” path.
You can hear Sargeant Stacker here:
“I repeat, my convoy’s been hit. I’ve got wounded… (static). We’re on the Tsavo Highway about… (static) …east of Voi. Someone, anyone, please respond!” [Tsavo Highway, Halo 3]
Sargeant Stacker’s line helps to reinforce the overall tone of the level: the base has just been taken out and everyone is trying to get a handle on things. The plan right now is simply to get away from the base. Regrouping is a priority, but escaping alive certainly has to come before that. I like this entire level in particular because it embodies the mood that we’ve been expecting since Halo 2’s E3 campaign demo: Earth is under attack – a major city has been glassed and the UNSC’s ground troops have been reduced a few platoons running around in the desert trying to stay alive.
The next encounter is awesome. As you round the bend, you can see a battle already underway – and you get your first glimpse at a Brute Chopper, right as it plows into a Warthog full of marines. Green plasma bolts race through the air as a Chieftain on the left fires a Fuel Rod Cannon at a small group of marines engaging him from a small structure on the right. And as you enter the area, another Chopper emerges from the right, hitting an incline and flying into the air, as it helps finish off the smoldering Warthog.

Taking down the Chieftain opens the way for you to get involved in the rest of the fight. Multiple Choppers zoom about, while a turret overlooks everything from a rock jutting out from the ground. And don’t get too close the Brutes running around – I’ve been stuck many times by a Spike Grenade. This encounter is a blast; I usually end up driving a route with my Warthog that allows for maximum shooting time for my marine gunner, while still keeping me close enough to the buildings so that I can pull behind one for cover if a Chopper has me in his sights. Sometimes, however, I’ll hop of out the ‘hog and pick up the Chieftain’s dropped Fuel Rod Cannon. If you’re a sharp enough shot, then you can reduce the Choppers to shrapnel.
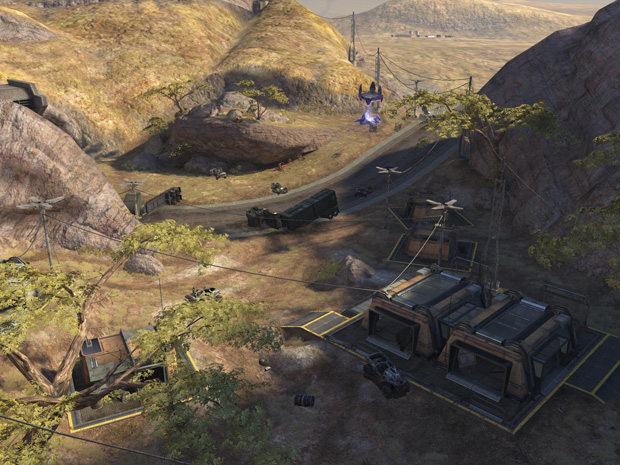
If you’re planning on using the Warthog to drive past the upcoming encounter (why would you want to do that?), then you should pick up the grav lift located in the building seen in the bottom right of the following screenshot:
Drones fly out as you approach the shielded tunnel, and they’re easy pickings for your Warthog gunner, if you stay far enough back. Watching my gunner pick off these guys is satisfying, even when I’m just driving – I think it has something to do with the way they drop suddenly out of the sky. And the shield door here is a nice way to force you into an “on-foot” encounter. You have to bring it down to progress, and you have to fight the Brutes to bring it down (they’ll kill you if you try to destroy the generator and run back to your ‘hog).
Moving into the tunnel, a holographic receiver on the right is picking up the Prophet of Truth, delivering a short speech:
“The gods will not begrudge our excavation. By uncovering this relic, we pay homage to their glory. When the dust settles, we will all see what I already know: here, lies the path, the start of our Great Journey!” [Tsavo Highway, Halo 3]
The beginning of his remarks speak to the Covenant regarding the possibility that, by digging up this buried treasure, he is somehow blaspheming the Covenant’s devotion to Forerunner artifacts. Understandable, since what lies beneath the earth is the very item that will supposedly start the Great Journey – and it is being dug up by cruisers blasting plasma at it as quickly as possible.
Every time I drive through this tunnel, and I see the hole in the roof, with sunlight shining down, I expect to see a Scarab leg poke through, as it walks above. I guess I’ve played too much Halo 2.
Upon exiting the tunnel, the dynamic lighting quickly adjusts, simulating your vision altering when exposed to brighter lights (this happens all the time in-game, but I really think it adds to the moment, here). Before that is completely finished, though, a transmission breaks through:
“Commander. This is ONI Recon one-eleven. The cruisers above… (static). They found… (static).”
“Say again, Recon? You’re breaking up.”
“There’s something in the crater, ma’am. Something beneath the storm.” [Tsavo Highway, Halo 3]

This is a moment that many of us probably remember hearing about from the IMAX showings, but that does not reduce the epic feelings that it induces. The sound that first occurs – possibly the ship breaking the sound barrier, or emerging from Slipspace – followed by the rumbling and darkening of the sky; it all adds up to create an awesome moment.
I find it interesting that “ONI Recon one-eleven” is reporting to Commander Keyes. I believe this is the first time the ONI is referenced in-game. In the Halo novels, the Office of Naval Intelligence is the deepest layer of intelligence in the UNSC – they deal with everything from the capturing and exploiting of Covenant technologies all the way to uncovering and studying Forerunner secrets; so, it makes sense that they would be at the helm of any study into what the Covenant are looking for. This is another example of Bungie doing the fans a great deal of service by including something from the novels into the game – and it is something that fits in perfectly.
Before you leave this area, you have the chance to grab the Tough Luck skull.

You can see its location in the mid-right-hand side of this screenshot. Take the yellow ladder on piping right before it reaches over the ravine. Follow the piping to the right until you see a concrete walkway below. Drop down to the walkway and continue into the ravine. As you reach the end, look to your left; the skull sits on a rocky outcropping, jutting from the side of the cliff.
This is your first opportunity to see the Covenant Dreadnought parked in the center of the uncovered structure. Surrounding it are dozens of Covenant excavation cruisers that periodically fire bolts of plasma into the crater. Also seen here are the Banshees that have actually been visible in the sky throughout the level. It is obvious now that they have all been headed towards the crater.
Even further in the distance, beyond the crater, you can see the smoldering remains of the city of New Mombassa.
If you picked up a grav lift earlier, now is the time to use it to pass over the gap.
Miranda and Johnson finally come through with instructions:
“Master Chief? Finally, a good connection. Truth has excavated a Forerunner artifact. We have to assume it’s the Ark.”
“Keep pushing to the town of Voi, Chief. Resupply birds will meet you in the next valley.” [Tsavo Highway, Halo 3]

Passing under the pipeline, you find yourself entering a battle already in progress; this is considered to be one of the toughest encounters in the game. If you’re a noob, and you want to quickly skip over this section, then you have already used the grav lift and can drive your Warthog straight through (it might take a few tries). Otherwise, you have a lot of options as to how you want to tackle this battle.
If you take an immediate right after passing beneath the pipeline, you can double back and get on top of the structure. You’ll find a sniper waiting for you. There aren’t a lot of rounds in it, but there are enough to help you take out a few Brutes, and maybe the Chieftain with the Fuel Rod Cannon. When the sniper is empty, you can hug the ridge on the left to meet up with your marines holding out in the building against the valleyside – if they’re still alive; typically, they aren’t.
If you brought the Warthog over, then you can attempt to let your gunner pick off some of the closer Brutes. But underground piping and the semi-trucks make turning around tricky, and if you slow down, you’ll usually get stuck with a Spike Grenade. And even if you find a decent route, the Brutes will almost definitely throw up a Bubble Shield to protect themselves from your attack. If you make it past the first few Brutes, be careful: the Chieftain has a Fuel Rod cannon that will take apart your now worn-down ‘hog.
The concrete pipes on the right provide a good opportunity to take pot-shots at the Brutes, as long as you watch your angles – the splash damage from a single Fuel Rod blast will take you down very quickly.

I find myself using the first strategy the most: making use of the sniper and then making way to the marines’ buildings, while using the preceding structures for cover. I also typically pick up a Plasma Pistol on the way over. Inside the two buildings that you reach, you’ll find plenty of Battle Riffle ammo, as well as another sniper and a few grenades. The angle is not great for the sniper, and it is especially hard to snipe if the Chieftain is still alive – you can’t stay in one place for very long while he’s holding that Fuel Rod Cannon. Well, I guess you can, but you’ll get killed by the splash damage as you try to escape the blast’s impact area.
After defeating the enemies that were waiting for you, a Phantom will continually come in and drop off more and more Brutes.

I usually use a Plasma Pistol burst, coupled with a BR shot, to take down the Brutes. Watch out for the ones with jet-packs. They’ll fly up to the ridge on your left and take you down before you realize what they’ve done. Sometimes, they’ll even fly directly over you and land behind you.
This is one of my favorite encounters in the game. You’ve got plenty of BR ammo to use on the enemies at the bottom of the incline, but you’ve got to watch your back so that you don’t get flanked. And then, at the end…

With the last wave of Brutes, comes a Wraith that will continually lob mortar blasts at you. A great way to the end battle – I always enjoy outsmarting it by sneaking around and boarding it from behind. I feel especially tricky when I use a Plasma Pistol burst to keep it from spinning, while I flank it.
If you manage to keep the Wraith alive at this section, you can use it in the next area. A Pelican will come in, when the battle is finished, and drop off a Warthog, which you can also take, if you desire to. I typically take the Wraith, since the marines will hop on the ‘hog and provide good support while I work on the tougher vehicles, like the Choppers.
And moving into the next area, the Choppers come, accompanied by the main Halo theme. If your marines do their job, then the Choppers will concentrate on them, while you can blast them into nothingness. This is an area where the game shines – if you play your cards right in one battle, then the next will play out entirely different. Capturing a Wraith alive is a great accomplishment and it definitely pays off.
Passing out of the tunnel, you get the chance to take out two Brutes before they can get to their Choppers and cause some real trouble.

Yes, that’s his hand on the right, there.
“Master Chief, a Wraith! Brute Choppers, too, sir, stay sharp!” [Tsavo Highway, Halo 3]
This is where the Wraith and your marine cohorts really come in handy. As much fun as it is to drive a Warthog around in this area, it means almost certain death in this area, due to the Choppers and their guns’ tendency to send a Warthog flipping.
The Halo theme continues through this encounter, providing a fantastic soundtrack to the (usually) epic battle that is taking place.
Every time your marines’ ‘hog gets destroyed, a new one, complete with a new set of marines, will spawn back up at the tunnel exit to come help you out; so, take your time with this one: things will remain epic for the duration of the battle.


For the record, I counted, over the course of the battle, two turrets, three Wraiths, eight Choppers and at least two Phantoms that fly overhead and fire on you.
It’s pretty much a rule that you have to keep a Wraith alive to “smash the Brute blockade” ahead. There are a ridiculous amount of Brutes at the top of the bridge, so having a Wraith is both helpful and enjoyable.
Before you move down to the final area, the Prophet of Truth has a bit more to say:
“My Dreadnought; the vessel that has long been the focus of our worship, now rests on its true pedestal. Even now, its holy engines spark greater ones below; relics, long without power, yet ready to fulfill their divine purpose. Stand fast! Keep our enemies at bay! Soon, my brothers, we will all have our reward!” [Tsavo Highway, Halo 3]
The Prophet obviously has an idea of what is happening: “its holy engines spark greater ones below.” I wonder if he has any idea of what is actually about to take place.
The last section can be tackled in multiple ways, as well. A sniper is provided right before the Brute blockade at the top of the bridge, but, being on Legendary, it doesn’t have enough shots to do a whole lot of good.
While the downed Pelican provides a nice aesthetic touch to the environment, it, and the barriers scattered about, do little to protect the Brutes from an onslaught of mortar blasts.

Lord Hood closes this level with a few encouraging words to his troops:
“Marines; the Prophet of Truth doesn’t know it, yet, but he’s about to get kicked right off his throne. You will take our city back, and drive our enemy into the grave they’ve been so happily digging. One final effort is all that remains.” [Tsavo Highway, Halo 3]
![]()
Check out the addendum for the Legendary saved films and some gameplay tips; and stop by the Ascendant Justice Halo 3 forum to read discussions regarding various aspects of Halo 3’s campaign.
Very cool stuff you have here. I’ve spent hours reading these articles. Its nice reading about stuff I missed in the campaign even after playing through it so many times. Anyway, something weird happened to me on this level. I was playing on legendary with the IWHBYD skull active driving the Warthog in the area just before the first shielded tunnel. I was driving by the broken bridge and the gravity lift platform when I was forced halfway up the rock wall behind the platform and I swear I heard the Jerkstore Grunt from the last mission. Has this happened to anyone else, or anything like this? By the way Squirrel Shape is my gamertag; add me if you feel so inclined. I don’t get to play that often though.
Comment by Squirrel Shape — December 22, 2008 @ 12:38 am
i’ve only read this far in the series of articles, and it’s already making me want to fire up my ‘360 (which lies about a yard from my bed where i type this…No, it’s not that comfortable to play while laying down).
Comment by Poopskintheliar — March 8, 2009 @ 12:10 am
Tsavo Highway introduces a new enemy- Brute snipers! Seriously, if you go on the floating platform before you go to the roundabout, you’ll see a brute minor wielding a beam rifle!
Comment by Chistian Bethel — April 22, 2009 @ 2:58 pm
Even though the Wraith is the easiest way to beat the Choppers and Wraiths after the series of buildings outlined, another amusing way to do away with the Choppers is to drive the Warthog up the little ridge to the left of where the Wraith first floats in and attract them with the turret. Once they’re close, they often have trouble turning, as all Choppers seem to, and they are easy prey for a few fuel rod blasts each. Even if the Maines are all dead, there are usually two up by the next couple of Brutes next to their Choppers after the short tunnel. They can be used to dispatch the Choppers in the open section ahead if you peek around corners as if you were on foot. Then you can actually climb up the near side of the ridge torwards the Wraith sitting on the broken bridge. If you take back your passenger’s FRG (or pick up another- they’re all around the dead bodies here, with one right under a part of the bridge, up against the rock face), then you can take out the Wraiths on foot, provided a good deal of luck. It can be frustrating, but is beautiful when it works out. Just watch out for the extra turret if you didn’t already take it out.
By the way, all the barriers that stop vehicles can be taken out from outside them provided a great enough blast. A tripped trip-mine or a Wraith’s mortar knocks them down each time, as do a few fuel-rod blasts. That’s how I usually do it.
Comment by TheAsterisk! — April 27, 2009 @ 1:25 am
by the second downded phantom you encounter i sometimes hear a brute say no hit the carrier kill that half jaw and his crew WTF i mean its not as if theres a massive battle going on in space is there?
Comment by Josh butterballs — June 16, 2009 @ 2:42 am
Personally, I drive the normal Warthog. When i kill a Fuel-Rod enemy, i give the gun to the person riding shotgun. They never run out of ammo, and are very accurate shots, notably taking down many of the Drones with dead-on hits. When i have 3 or 4 fuel rods, i drive the transport warthog. This firepower is massive: one drive-by and a wraith, a turret and two choppers were all destroyed. Seriously, humans with fuel-rods are WAY to accurate, especially with unlimited ammo.
Comment by Richard117 — October 18, 2009 @ 1:16 am
Hmm have you ever taken the fuel rods from the brutes beforethis and the one after you lose your hog and using themto blow up the phantoms? I always thought it was fun because I couldnt do stuff likethat in H:CE orH2
Comment by Matt — August 6, 2010 @ 4:14 am