The Storm

“Chief, the Prophet of Truth has found the Ark. Our only chance of stopping him is a surprise aerial assault. Clear this sector of Covenant anti-air defenses. Make a hole for the Admiral’s ships. Good hunting. Keyes out.” [The Storm, Halo 3]
Despite the destruction of the Crow’s Nest and the scattering of the UNSC’s forces, some troops have regrouped and Lord Hood’s plan is set back into action: the Chief will lead an assault on this Covenant-controlled area in order to bring down AA defenses, so that the Admiral’s ships can stage an assault on the Covenant’s Dreadnought.
The level opens with the theme that Bungie chose to represent the UNSC during Halo 3; it was previously heard during Crow’s Nest, and, before that, a slightly altered version was used in the second level of the first game, Halo; it was called “Brothers in Arms”. Once established, a theme such as this can immediately bring you into a certain state of mind. In this case, for example, the UNSC theme reminds you that you have a job to do, a task that your commanding officer requires you to complete. It helps tremendously that Halo fans are familiar with this theme, having heard it first the first time almost seven years ago – and, even back then, it was associated with fighting alongside UNSC troops.
I also found it interesting that the level opens with you in the passenger seat of a ‘hog, unable to exit. Also, you’re in a tunnel with not much to look at. This forces you to pay attention to the dialogue, which sets the stage for the level you’re about to play. It tells you what you have to do, and why you have to do it. The music, the troops around you, and the way the game pushes you to pay attention, all work together to establish a foundation for the battles you’re about to engage in.
Upon exiting the ‘hog, the Marines all move forward, guiding you both physically and verbally to where you’re supposed to go. The blast doors are very useful in this level in the sense that they partition off fights, giving you plenty of time to prepare for a battle, and recover once it’s completed. Before you enter the first area, the Marines let you know what’s about to happen.
“Ready when you are, Chief. Open the door, take point; we’ll cover you with the fifty!” [The Storm, Halo 3]
In other words, get ready – the battle is about to begin. A line like that comes at a nice place. This is the fourth level of the game; you’ve been fighting and you know how hectic it can get. It’s a change of pace to be able to actually prepare for a battle; to know that there’s a door between you and the enemy, and you don’t have to open it until you’re ready.
Also, this gives you a chance to explore the environment. Most people follow the Marines’ leads and move into the first room. But the area that you emerge into from the tunnel is a pretty beautiful environment.

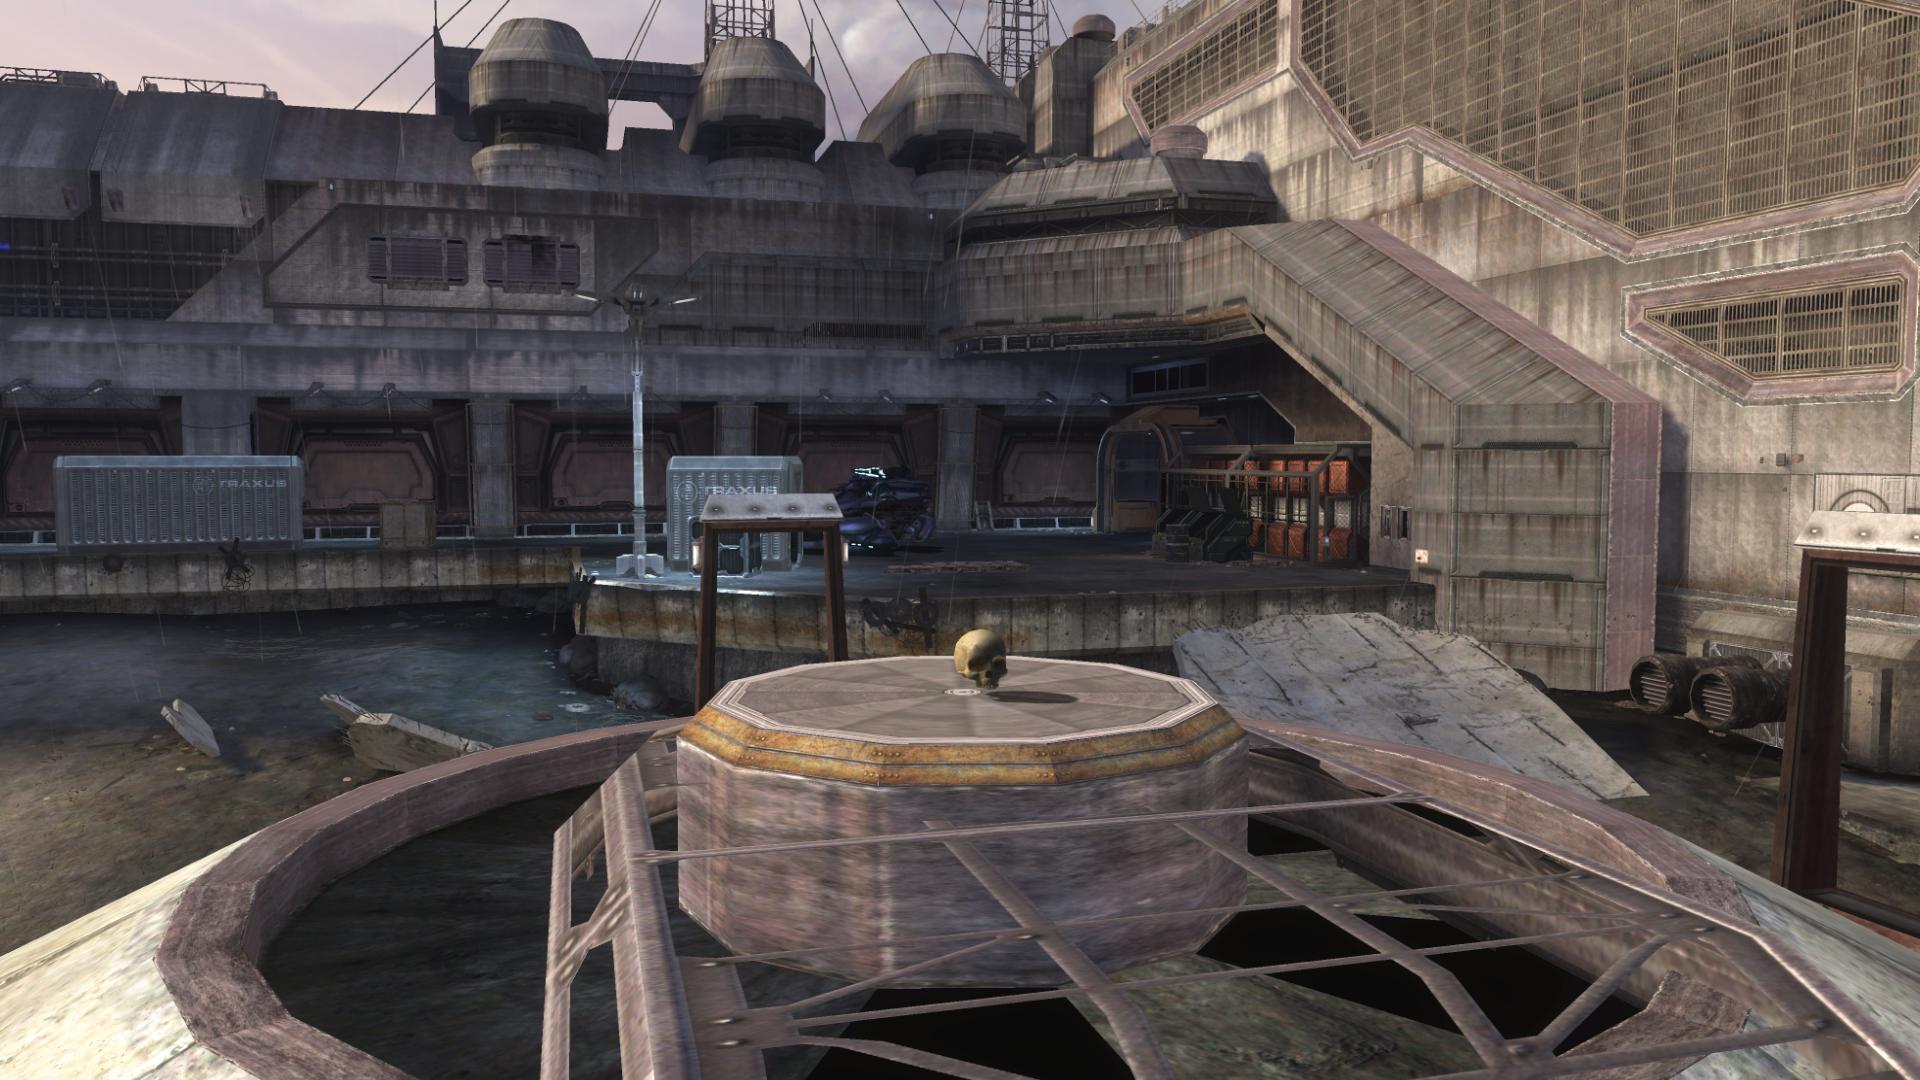
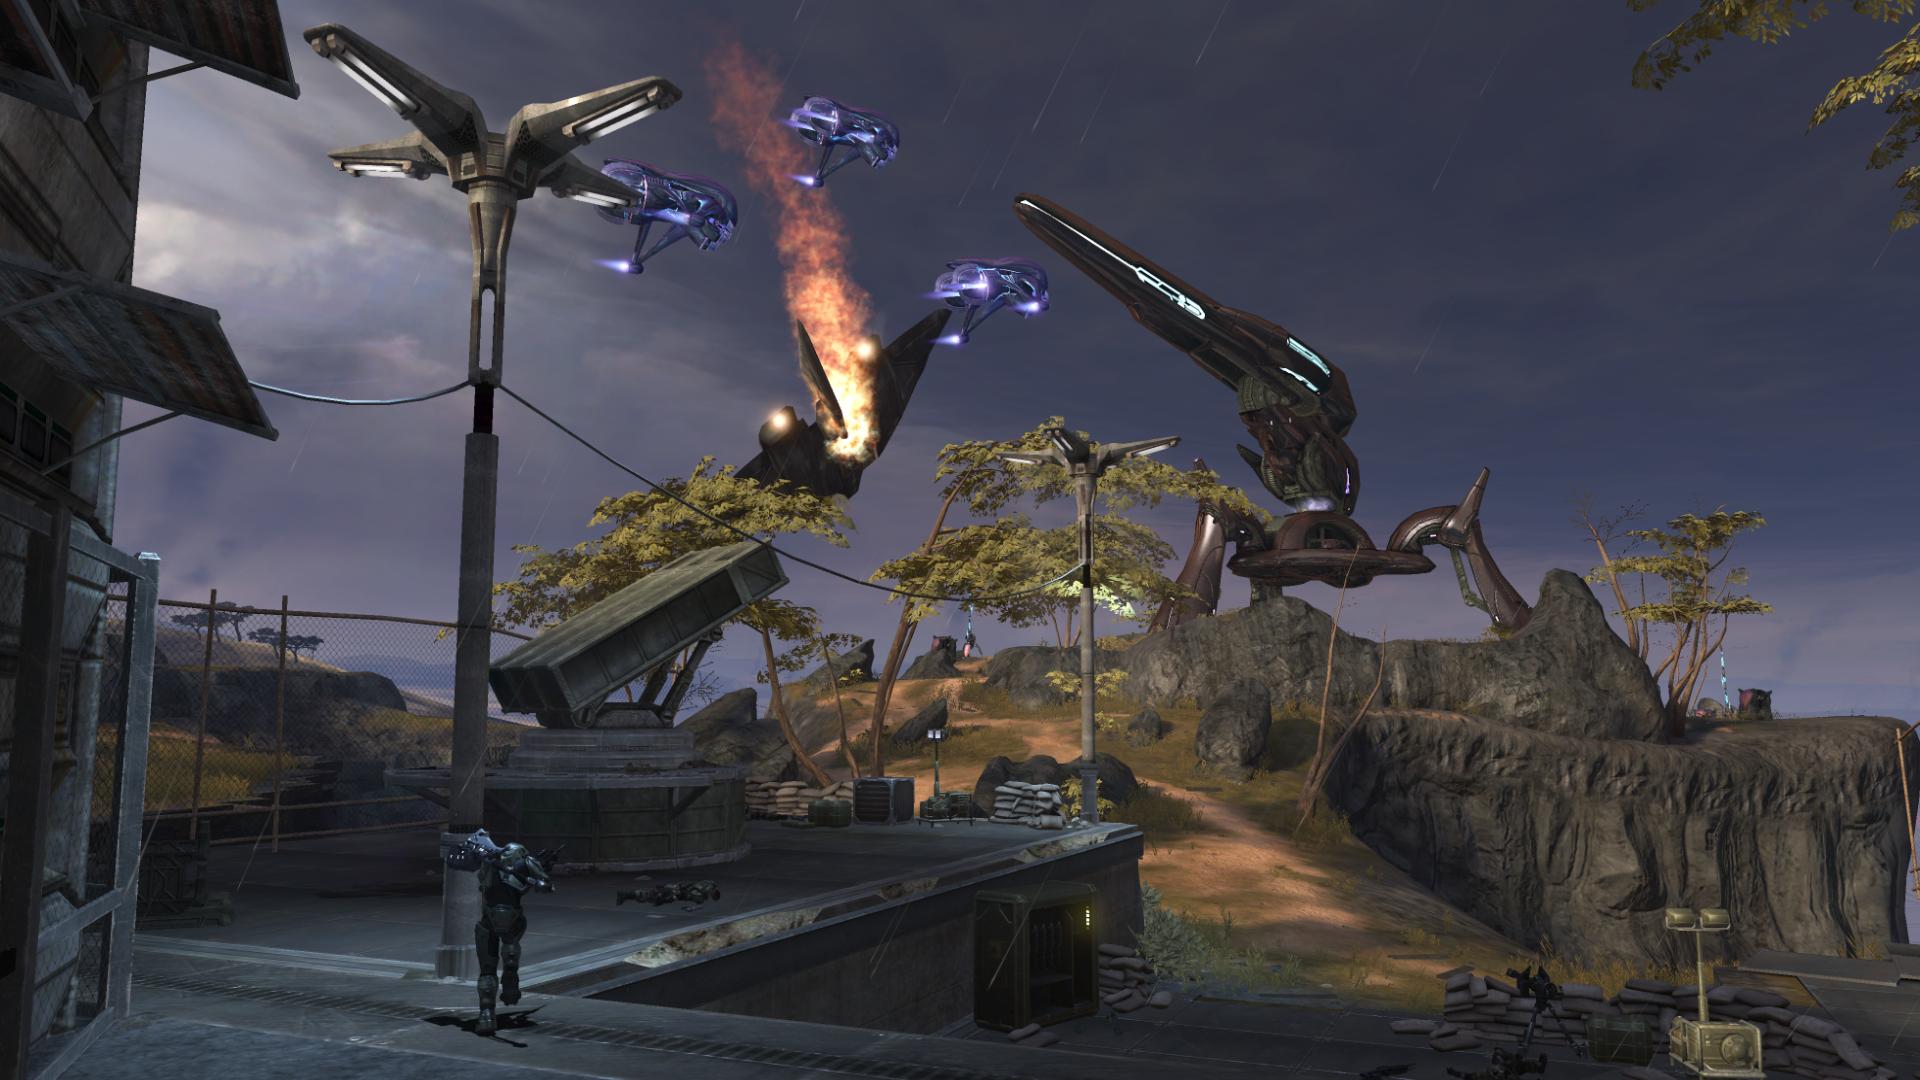
It’s raining. Not pouring rain, but drizzling. A fitting weather status, considering the storm that looms in the sky above. You may have noticed it as you emerged from the tunnel. Swirling in the distance, it is definitely unnatural. I’m not sure if I’ve ever seen anything like it in a game before. It is obviously not a static matte painting background. Its swirling gives it an obvious feeling of being real, and massive. The waning daylight also helps to establish an ominous mood, in stark contrast to the blue skies and sunlight of the previous level, Tsavo Highway. Also seen in the distance is the Crow’s Nest.

We’re in the fourth level of the game and we can still see the second level. This adds, for me, at least, a great sense of continuity. It reminds you of where you’ve been, and, in doing so, where you’re going: the Covenant destroyed your base, and now you are helping to prepare an assault on their own base. This is also a theme from Halo 3 that many people enjoy; the mission in this level is not “Chief, destroy the Covenant’s Dreadnought.” The player’s job is to destroy Covenant AA, so that UNSC forces can move ahead and bombard the Dreadnought themselves. This takes me back to a scene from the Halo 2 E3 demo. Near the middle of the demo, the Chief moves into a battle, where a small platoon of UNSC troops are pinned down by Covenant forces, with a massive Covenant AA gun firing in the distance. The Chief overhears Sargeant Banks order an air strike on the gun, and two jets promptly bombard and destroy the gun. The Chief wasn’t involved at all. This theme has been prominent in the battle for Earth, and it continues in Halo 3. Master Chief may have been a one-man army in Halo 1, but he’s moved onto a grander stage now, and while his role is still important, he sometimes plays a supporting role, rather than the lead.
Getting back to the area at hand, there are a few items of interest to be noticed. The area is quite detailed, with usable ladders and light poles that can be scaled. It should probably be mentioned that this entire level borders the excavated area that the Covenant have dug up. One can only speculate on how the city looked before half of it was blown away to reveal the structure hidden below. Tattered foundations and bridges that lead to nowhere now mark the city limits. One specific item of interest is a missing persons flyer:
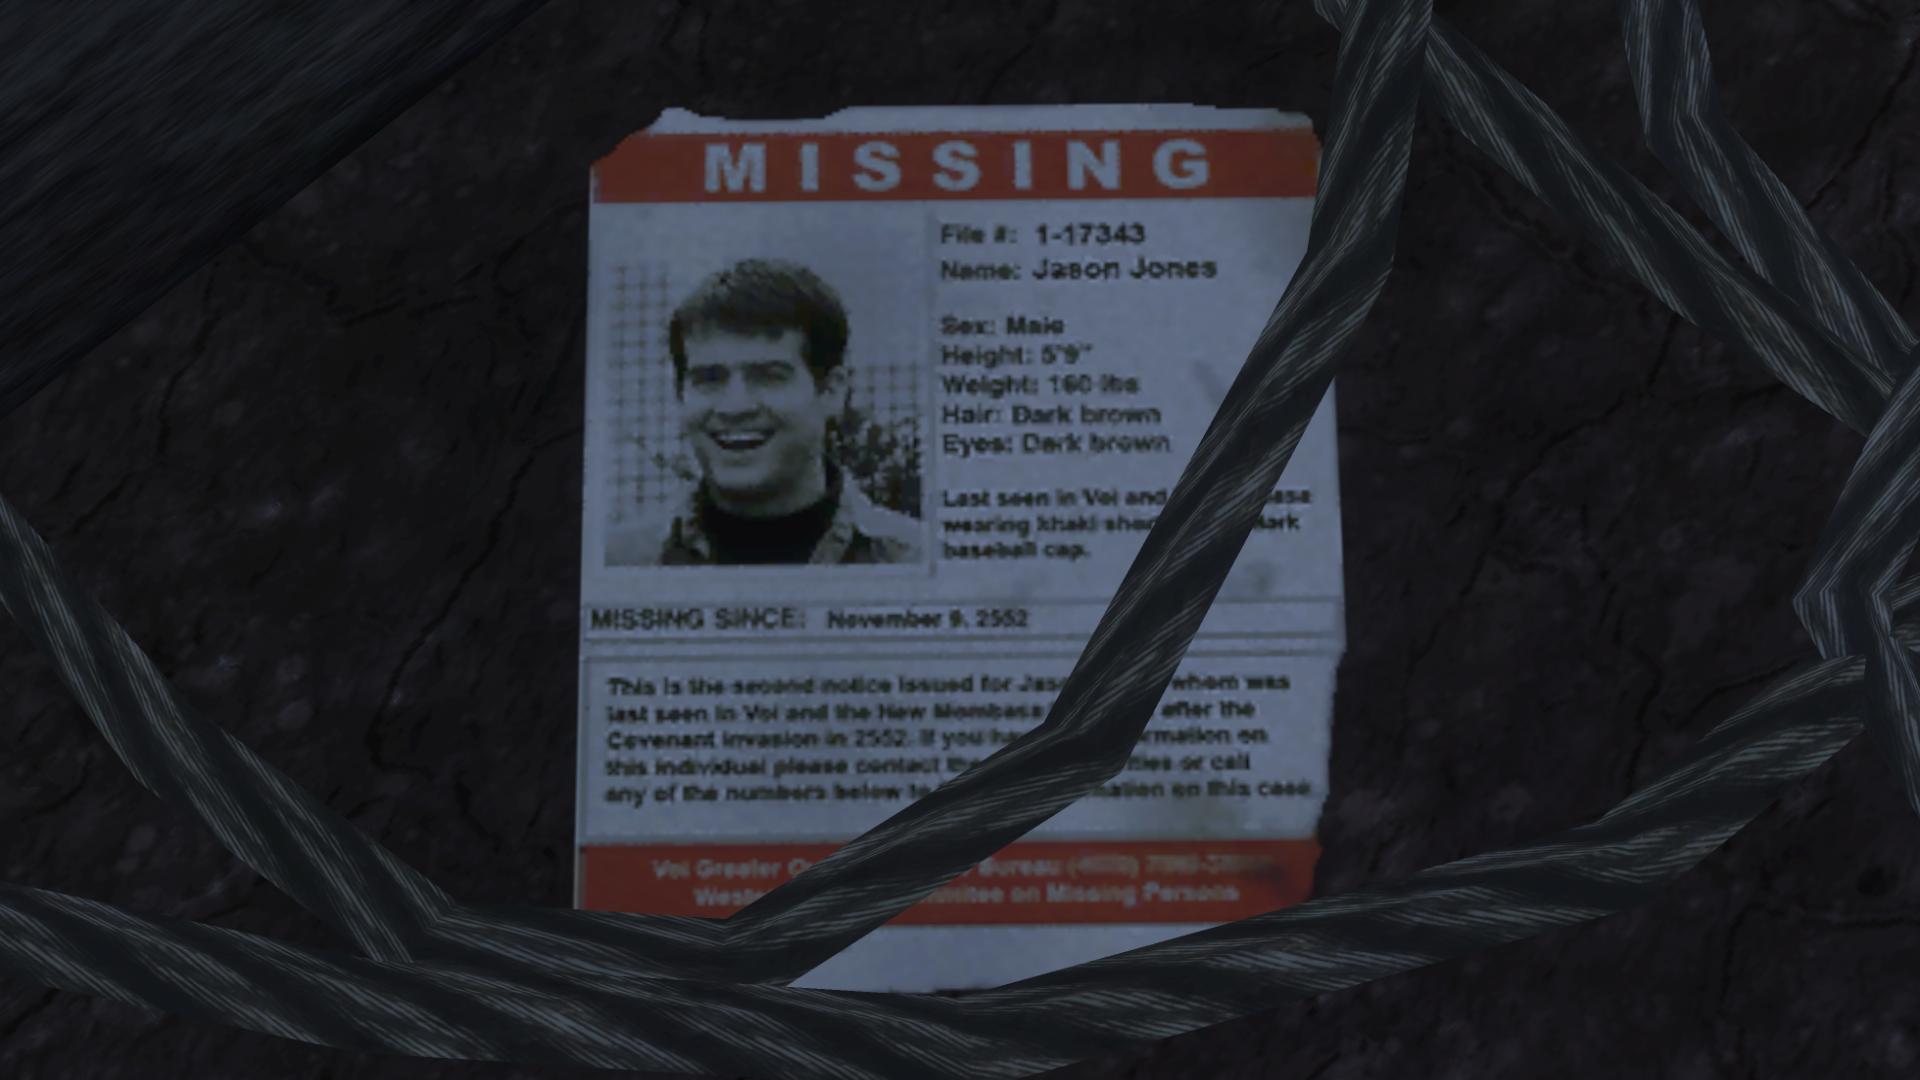
It states that Jason Jones (co-founder of Bungie) was last seen in Voi on November 9 (the launch date for Halo 2) in the year 2552. The contact number is smudged and unreadable.
Moving through the door, it turns out that the battle doesn’t immediately begin. You have a few moments to familiarize yourself with the type of environments that you’ll be seeing for the interior portions of the level. From the next room, however, you can hear Covenant dialogue. The Prophet of Truth, whose voice should be recognizable by this point, can be heard.
“With my gentle encouragement, our lords’ holy relic springs to life. It is unfortunate that our enemies also bear witness to its glory. But, soon, their dull eyes will be closed, seared by the rings’ unforgiving might.” [The Storm, Halo 3]
Moving onto the platform above, you can see a few Covenant soldiers standing near a hologram pedestal.
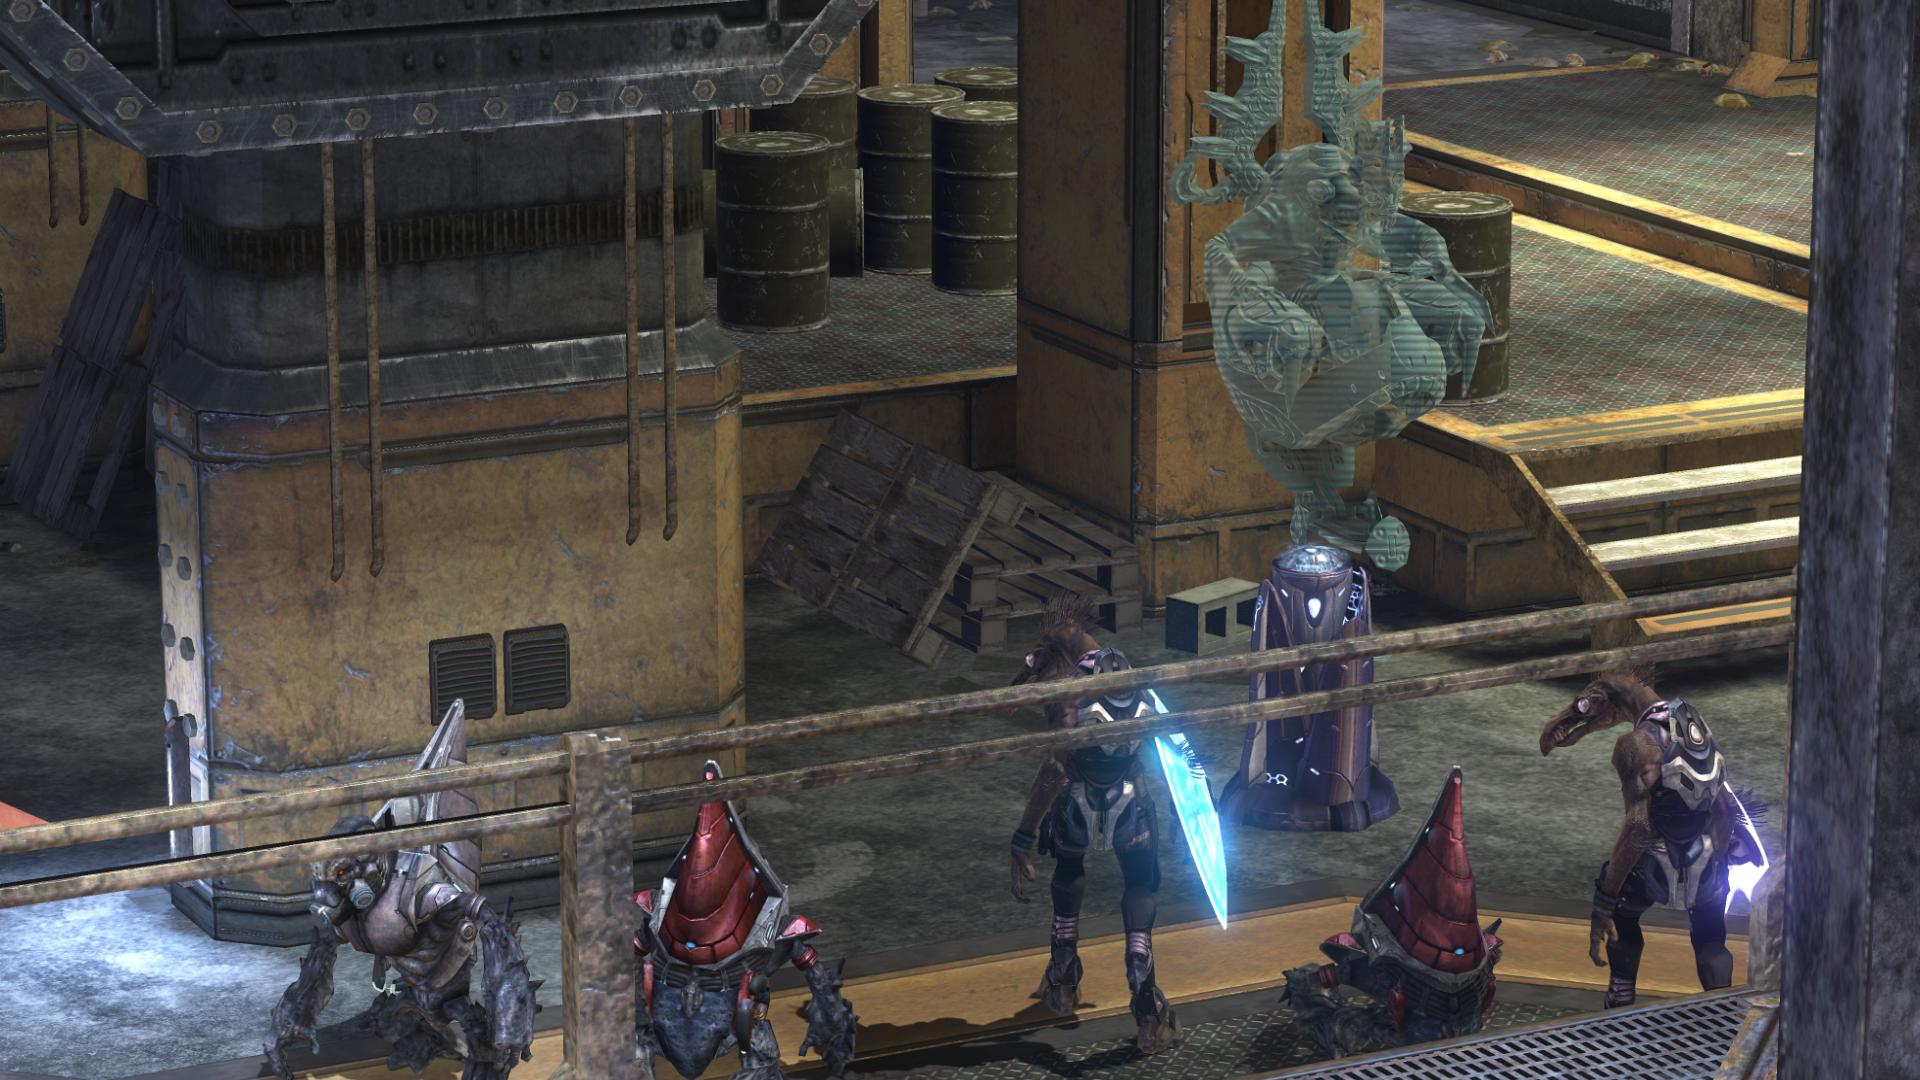
A well-placed grenade will silence Truth and forever deafen a few of his followers.
If you continue fighting the Covenant forces without activating the door controls, a Marine Sargeant will remind you to do so, so that the Marines can provide support with the Warthog. There is something inherently awesome about a Warthog with a big chain gun slowly moving through a tunnel. Even though the confined spaces allow for a few grenades to take it down, I still feel pretty secure knowing that that thing is backing me up. Especially when I open the next door and see a small army of Covenant soldiers.
A few well-placed grenades will take them down. In this same area, you’ll find two Ghosts, which should give you an idea of what sort of area you’ll find through the next door.
This encounter can be pretty rough on Legendary. It has lots of Ghosts, which are basically killing machines on the game’s highest difficulty. Fortunately, you have a myriad of options as to how you want to tackle this area. Before you even move into the lake bed, you get to decide whether you want to drive the ‘hog, man the turret, or take a Ghost. All three options are risky, since the enemy Ghosts can take you down very quickly on both the ‘hog and the Ghost. Once into the area, you have to constantly stay on the move, lest the Wraith on the far end hits you with one of the mortar blasts that it is constantly lobbing. The middle area has a Sniper Rifle and a Missile Pod Launcher, but you first have to take down a small Covenant squad that has the higher ground. And the Brute has a Brute Shot that works well from heights. Also, multiple Phantoms will fly in to drop off Ghosts throughout the course of the battle, so you have to watch out for those, too, both for the Ghosts (which will not hesitate to fire at you from the sky) and the Phantom’s plasma fire. In addition to all of that, there are a couple of Banshees that will move into the fight and plasma/mortar you if they feel like you’re doing too well against their allies. You have Hornets in the sky that try to keep them busy, but sometimes they fail and the Banshees are able to turn their attention toward you. Numerous times have I finished off the Ghosts and the AA wraith, and, while deciding upon a strategy for the Wraith blocking the door, I’ve been killed instantly by a Banshee’s mortar and plasma fire.
The Missile Pod in the middle will help you out a bit, but it doesn’t have near enough shots in it to take out all of the enemy vehicles that you’re facing. The Sniper can be useful for felling the Grunts on the Ghosts – but, unless you’re a crack shot, you have to stand still to take aim, and this is hindered by the constant mortar fire from the Wraith. Also, the Grunts sit so low on their Ghosts that they have to be turned to the side for you to be able to take a shot at them – for me, at least, I’m only able to knock off their Methane breathers from the front, which does make them highly susceptible to BR fire, but still, only from the side.
Staying on the ‘hog is dangerous due to the Ghosts’ ability to quickly take you down; if you stay on it, you’ll be forced to take pot-shots at the Ghosts from behind barriers, while hoping they don’t come after you. And staying on a Ghost is risky, too, since you can be taken down just as quickly. I find myself taking the center platform and, while staying on the move and near cover to avoid being killed by plasma mortars, waiting for the right moment to take down the Ghost pilots.
The Anti-Air Wraith is easy to take down, since it tends to not pay attention to you, and the weak spot on its back is exposed. A Ghost’s plasma fire can destroy it in a few seconds.
The standard Wraith is much harder, however. It has the high ground, and it can fire its mortar blasts quite quickly. I typically attempt to take it by surprise and rush up to it as quickly as possible. Even if you are able to board it, though, there are Covenant ground troops emerging from the nearby opened blast door. If they decide that they don’t like you, you’ll be killed while in the process of boarding the Wraith. It’s hard to take them down beforehand because of the Wraith’s position and its constant barrage.
Overall, this encounter is fun, but the numerous enemy Ghosts stifle your own vehicle activity. In a way, though, that forces you to get more creative than you might normally would.
One thing to mention: I would suggest clearing out as many enemies as you can and then hanging out around the center structure, where the sniper spawns. I was sometimes able to get a checkpoint there, which allowed me to not have to repeat 10+ minutes of gameplay every time I died.
Before we leave this area, I want to point out how staggering the attention to detail is. The barnacles on the concrete, the trash and debris that sit on the lake bed floor, the pipes and grating decorating the buildings, the concrete slabs left over from the city’s destruction, and the wooden docks that you can take cover under; it’s all pretty stunning. Not to mention that it’s still raining. I have usually forgotten that by this point, but the rain continues to drizzle down. And in addition to all that, the Dreadnought can still be seen in the distance, resting at the center of the massive structure that the Covenant ships are hovering above – all with the storm still twisting overhead. And even further in the distance, you can see the charred skeleton of what was once New Mombassa.
The Catch Skull is located in this area, so pick it up once you’ve cleared out all of the enemies.
If you managed to keep the Wraith intact in this last battle, then you can use it to pummel the Covenant forces inside of the building ahead. It is always particularly satisfying to me when a Covenant vehicle, which has caused me so much pain for the past 10-30 minutes, is turned against them by my hand. Too bad it won’t fit inside.
“They just keep coming!”
Check your fire! It’s the Chief!” [The Storm, Halo 3]
Upon entering the room, you hear an exchange between two Marines. While the point of the conversation is that one Marine is telling another that a friendly has entered the room, it serves the same purpose for you, informing you that the Covenant are not the only soldiers inside the structure, and to be wary of where you fire. The same Marine goes on to say that they’ve got a man on the fifty and he’ll nail the Covenant troops if you can flush them out. Once inside the room, you can see this Marine on the chain gun above the metal doors.
Hiding in the upstairs area of this room is a Brute Chieftain with a Plasma Cannon, along with a small group of Grunts. This Chieftain is hard to take down since he has a powerful weapon in a close-quarters area. Grenades don’t stick to him, so those aren’t really an option, and it’s hard to maintain fire on him for any length of time due to his unending stream of plasma bolts. I usually end up moving around the room, collecting grenades, and hurling them into his area. If you can rush up to him quickly enough, it’s also fun to avoid his attacks and melee him to death. Unfortunately for him, the Grunts don’t give him much help.
In the next room, you’ll find a weapons locker with BR ammo and Rockets. But while you’re collecting ammo, and the Marines are making sure no one’s injured, a swarm of Drones flies in from above. These guys are fast and, even though they’re only wielding Plasma Pistols, they’re quite deadly. There’s enough BR ammo here to be able to take them down, if you can survive their plasma barrage long enough to do so.
Once the Drones have been defeated – or even before they’ve been defeated: they’ll just fly away if you trigger the next section – a new Cortana flash occurs. This is the first one that’s happened since the Crow’s Nest.
“I have defied gods and demons.” [The Storm, Halo 3]
It is also Cortana’s first line that doesn’t directly reference a Halo novel. It is obviously recognizable as a line from the E3 trailer and its placement at this point in the game is significant. The events that occurred during the E3 trailer don’t happen exactly the same in the game, but were the timelines to be placed side-by-side, Cortana’s line would line up pretty closely. Since almost every Halo fan has seen the E3 trailer, having Cortana deliver that line at this time helps greatly to foreshadow the events that are about to take place.
You know something is about to go down when you see this:

Rocket Marines, especially on Legendary, are a blast to carry around; these guys are crack shots. And this lake bed doesn’t start out with any Ghosts, so you can move around pretty freely. The Choppers’ fire can easily kill you, or roll you over the cliff, but their maneuverability is limited, so you’ve got a good advantage over them. The Anti-Air Wraiths can be taken down easily from behind, and your Marines don’t usually hesitate to fire when they have a shot (although that can sometimes be a bad thing). The enemy vehicles arrive in waves, which makes this encounter a ton of fun, since you’re never totally overpowered by Ghost or Chopper fire. When you do find yourself in a rough spot, there are plenty of places to hide. The Mongoose’s compact design allows you to fit into tight spaces, and this level has plenty of those types of places for you to take cover in when needed. I’ve spent lots and lots of time on this encounter, racing around with my Rocket Marine, driving through the pipes, and making jumps in the center area.
And the best part hasn’t even happened yet.
“Both AA Wraiths have been neutralized. Standby. Something big closing in on your location.” [The Storm, Halo 3]

The Scarab tank. Many of us knew about it due to the pre-launch press; and all of us remember the Scarab from Halo 2. Well, it’s back, and it’s no longer a pre-scripted, harmless, walking building. It is a living A.I., and it will actively seek out and engage you and your Marines. Multiple Plasma Cannons are mounted around its exterior, and the Brutes onboard will fire at you as you get closer to it. The Scarab itself has a massive cannon that will constantly spray plasma at anything not hidden behind cover. Also, of course, it has its Scarab gun, which is almost a guaranteed K.O. if it hits you directly – even if you’re operating a vehicle. Like I said, it is no longer on a prescripted path – it will walk around of its own free will, taking whatever path it feels is best to get at its target; its massive size, however, does limit its ability to move around.
You have lots of options as to how you want to tackle this thing. If you still have your Rocket Marine, and I usually do, you can drive around beneath the Scarab, and let your Marine go to town on its legs. It will try to step on you, though, and it will also fire its Scarab gun if you move into its line of sight. I’m usually tired of driving around my Marine at this point, so I often pick up a Ghost, of which there are typically a few lying around. If you concentrate your fire on one leg, the tank can actually be brought down pretty quickly; well, “brought down,” might not be the best phrase – lowered momentarily would be better, since you still have not destroyed it at this point. In addition to the Ghost, you also have a mounted missile pod launcher near the building – and as long as it stays mounted, it has infinite ammo. Lastly, there are also two cranes, complete with elevators that will allow you to get some height on the Scarab. Since this vehicle has lots of enemies on it, this height advantage can be helpful for clearing out enemies, so that when you do finally board the tank, you’re not overwhelmed by Brutes in its confined spaces. There’s a sniper rifle at the top of the left crane (if you’re facing toward the Dreadnought) which you can use to help clear the Scarab.
Once you’ve brought the Scarab to its knees, you can board it from the back or from the sides (if you’ve blown off the hatches). Once inside, Johnson usually prompts you to “look for the core. You’ll know it when you see it.” Clearing out the Brutes and the Grunts doesn’t take too long and once you’ve done so, you can move to the back of the Scarab, on its second “floor,” so to speak. The Scarab’s “core” may seem familiar to you.
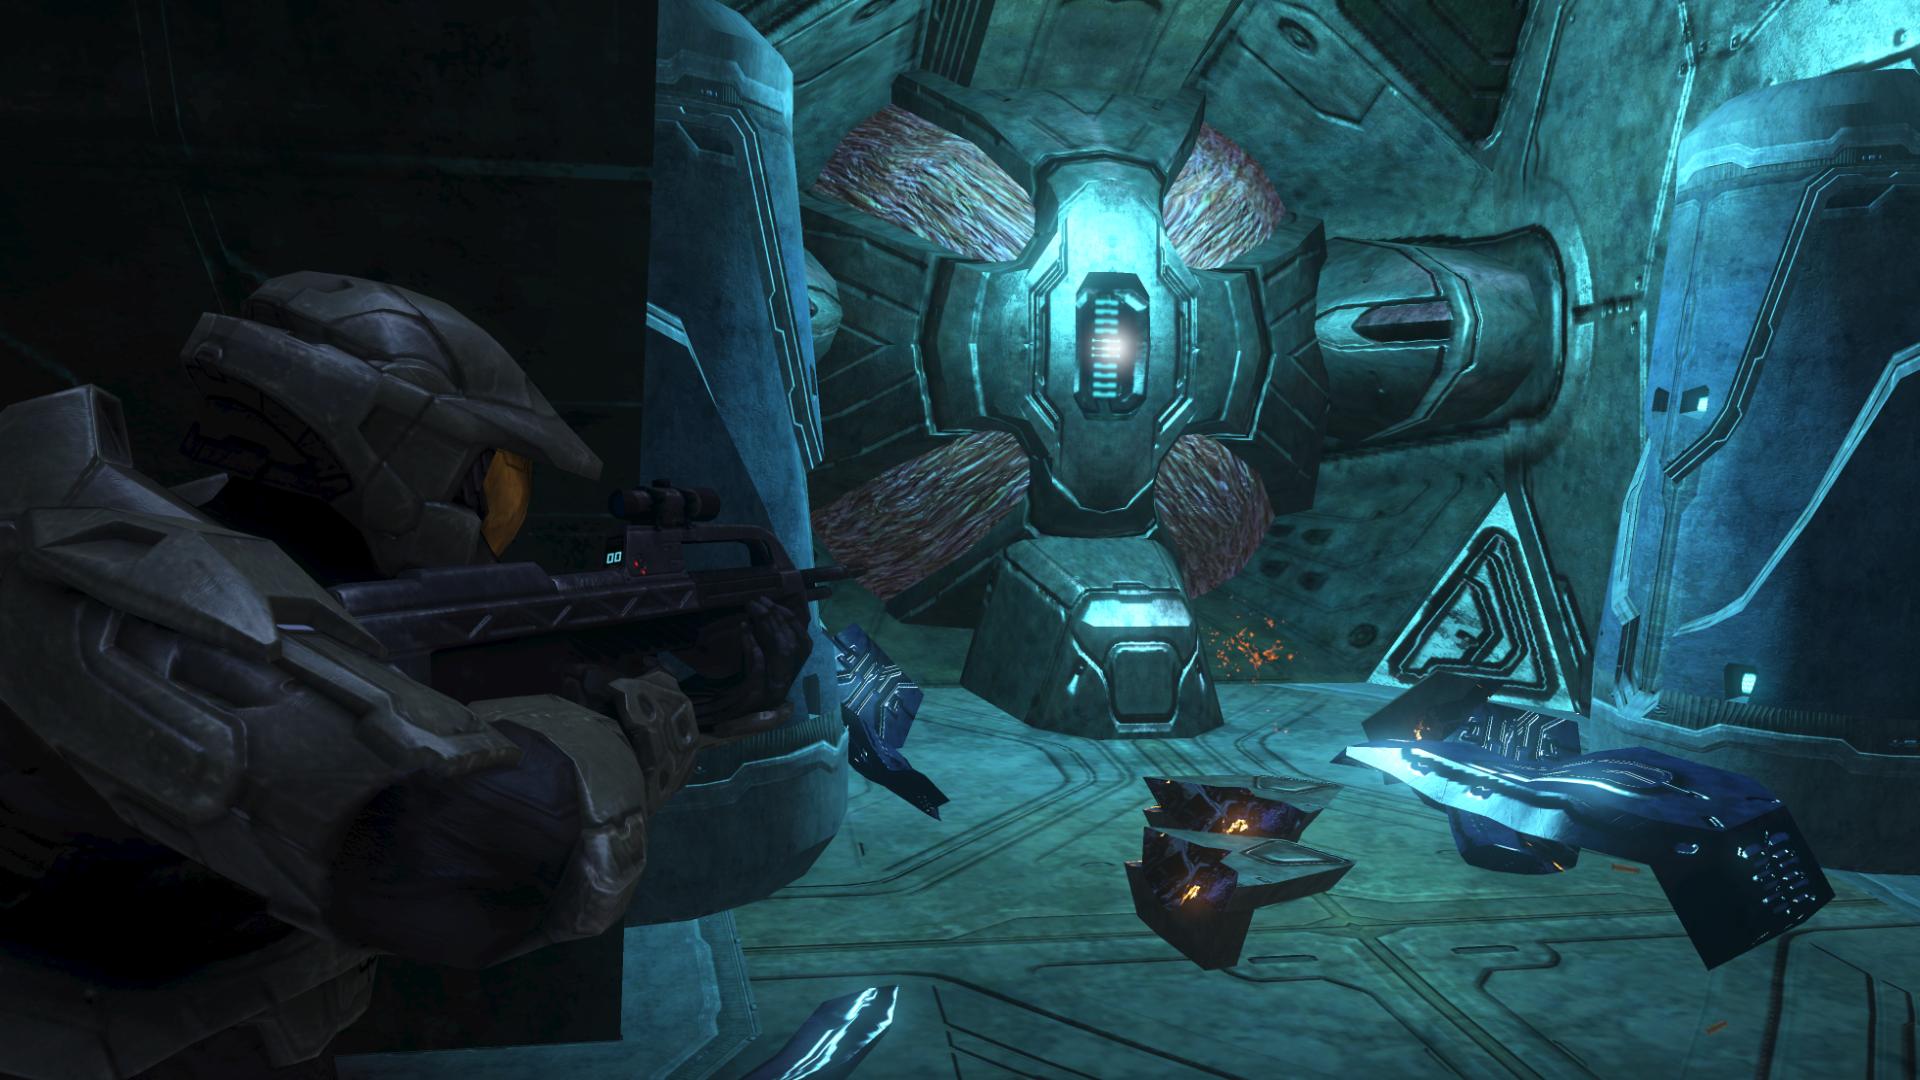
It bears a strong resemblance to the orange “worms” that make up the Hunter species.
Destroy the core and get ready for one of the most beautiful sights that Halo has ever offered.
Miranda informs you that you’ve done well by destroying the Anti-Air Wraiths, and there is just one obstacle left before Lord Hood can start his attack run. A Pelican arrives with some Marines and the Arbiter, who has been absent since the destruction of the Crow’s Nest. This is a good time to point out the ingenious use of his cloaking ability. Whenever you get too far ahead of him, he’ll warp to your position, but rather than using the old-style, co-op warp, with the yellow lights streaming upward, the Arbiter simply turns invisible, making use of his cloaking ability, which was available in Halo 2. He was there all along, you just didn’t see him!
One last thing before you leave this area: you can find, in the massive ship that rests near the cliff edge, a small poster:
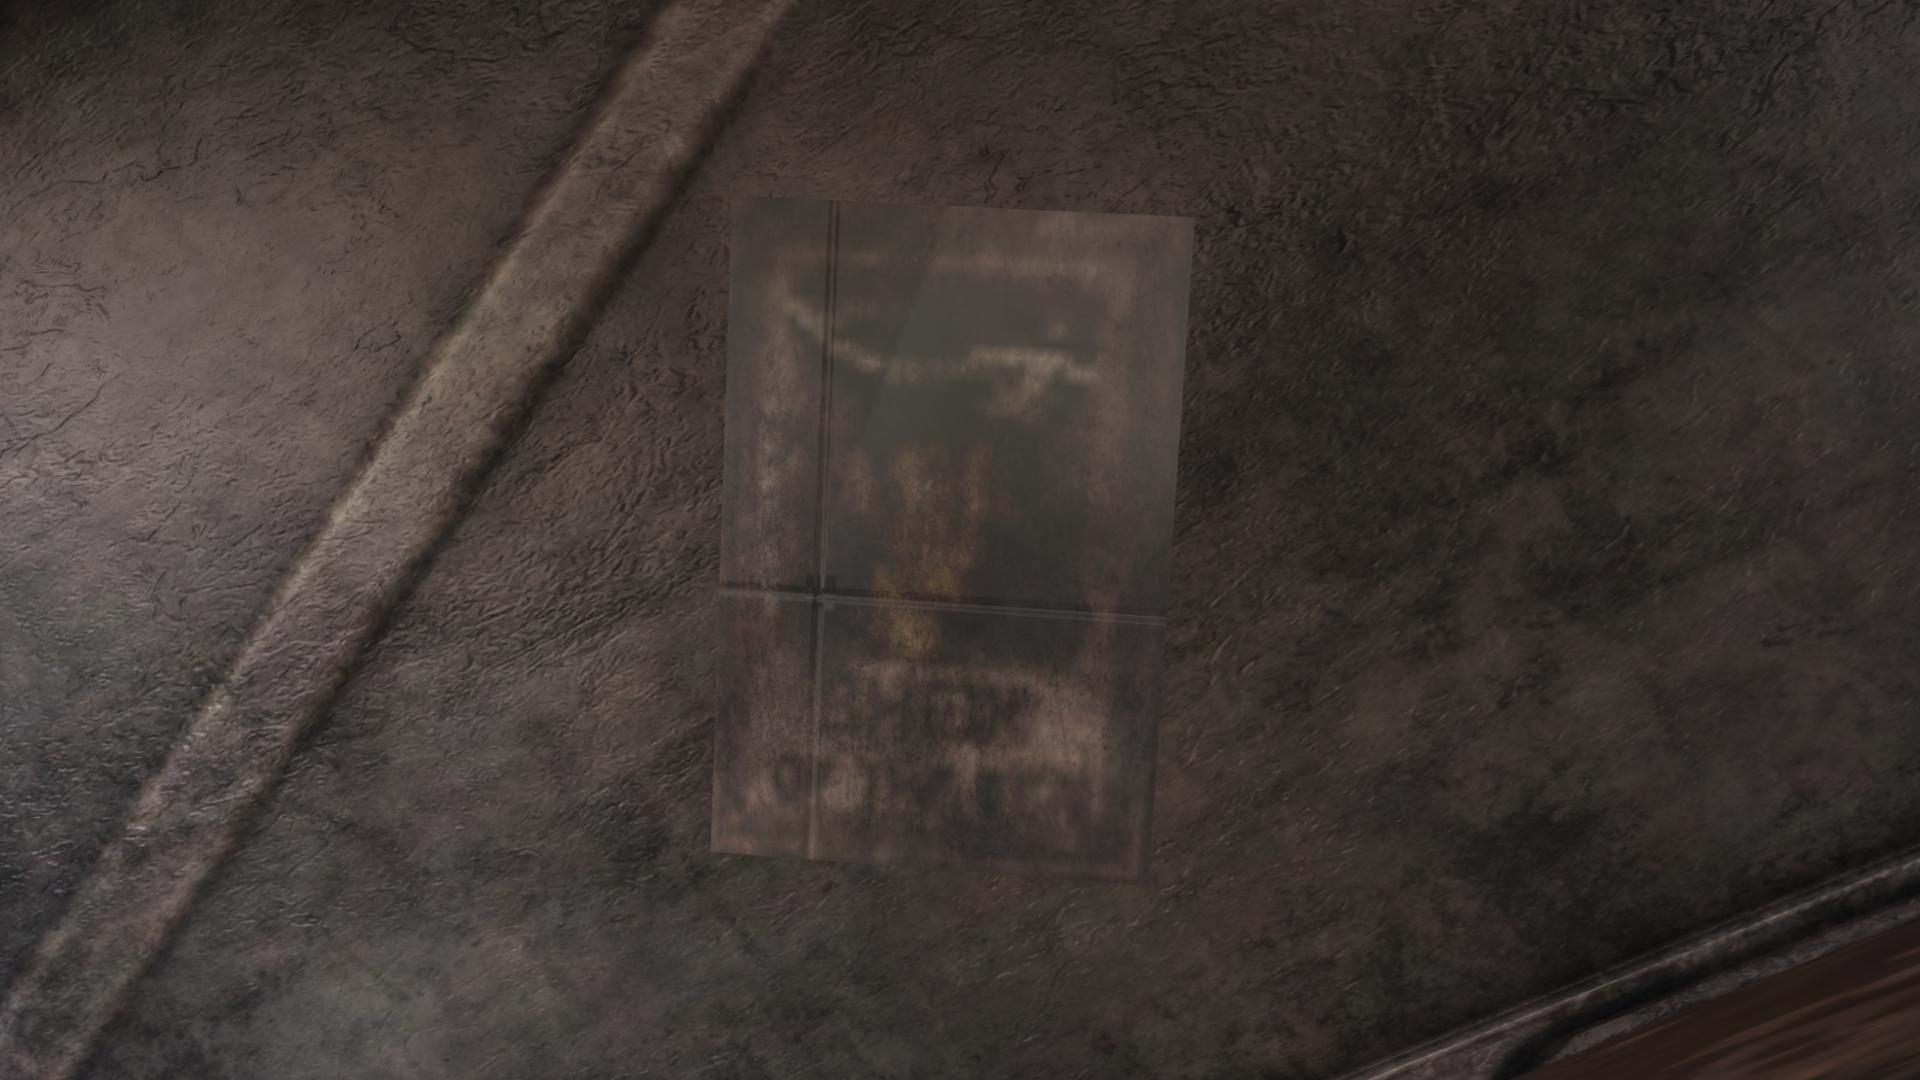
This is a reference to Bungie artist Shi Kai Wang, whose nickname, according to Bungie.net, is “Shiek”. Actually, they misspelled it on the poster. Oops.
A lot of Marines in this area. Moving through the building and seeing the injured Marines reminds me of the beginning of the Halo 2 E3 demo. The ambient noise and dialogue is really fantastic here; some of the injured Marines are moaning and asking for Morphine. And this section works really well as a cool-down from the last battle, since it was atypically epic.
Another Cortana flash occurs here.
“I am your shield. I am your sword.” [The Storm, Halo 3]
This line suits Cortana well, since she’s always functioned as both of these things whenever present with the Chief. For some reason, many people seem want to draw a Biblical connection to Cortana’s dialogue here, but the verses that most people are thinking of probably didn’t play a major part in Cortana’s dialogue, since Paul, in Ephesians, is speaking of a sword and a shield (and other armours) in a different way. Biblical references in Halo do abound, though, as we’ll find out later on in the game.
If you hang around inside the second medical room, you can hear an interesting conversation on a Marine’s radio:
“All Brute cruisers are pulling back to Truth’s ship. Winds inside the storm just hit 200 kilometers per hour. Energy cascades all over the artifact!”
“Admiral, a single Covenant ship just slipped in-system!”
“Just one? What’s its range and disposition?”
“Above the artifact, inside the orbital line. Seems to be holding steady.”
“The attack proceeds as planned, Commander. We’re not going to get another shot at Truth.”
“Sir. Yes sir.” [The Storm, Halo 3]
While the Chief’s progress so far has been good, the Covenant are still continuing about their task, seemingly unhindered. And, in addition to their progress with the artifact, a mysterious Covenant ship has just arrived in-system. It won’t be long before we discover its purpose.
There’s a Brute infestation in the next room; but don’t worry, you’ve got access to plenty of grenades and BR ammo. And after what you just went through, it’ll seem like a cakewalk, especially with your Marines and the Arbiter backing you up. You’ll also encounter some civilians in this area, wearing hardhats. Like faithful citizens, they’ll take up whatever weapons they find and help you fight off the Brutes. When you round some corners, you’ll see some of these poor guys being tortured by the Brutes.
The Brutes typically make good use of equipment here. If you’re hitting them with your Battle Rifle from afar, they’ll often drop Bubbles and force you to move in closer.

Hunters! Their first appearance in the game comes with a bang. Some unfortunate civilians get blasted by some fusion cores, as they are attempting to escape the path of the Hunters. These beasts, who always appear in a pair, are even tougher than you remember them from Halo 2 – and certainly a far cry from what they were in Halo 1 – and it seems as though they’re upset at the death of their massive brother (or cousin). A lot of rounds are required to bring them down; you’ve been provided a shotgun, which will do a good job knocking off their armour and exposing the Lekgolo beneath – but you have to get close to use that, and these guys have a powerful melee that means instant death if it connects. Doing battle with Hunters is tough, since it usually consists of a combination of long- and short-range fighting. Shooting them from far away seems unsatisfying, and when you move up close, you have to constantly dodge their attacks (and look out whichever one you’re not currently fighting).
The music here is very reminiscent of Halo 1; percussion-heavy music was prevalent throughout that game.
If you move too close to the garage door through which they entered, you’ll get pelted by plasma fire from outside. Behind the Hunters, a small Brute pack, complete with Chieftain, awaits. And, once you’ve finished off the Hunters, you have to deal with them. The Chieftain, if provoked, will use an invincibility powerup, which basically means “run and hide.” The Marines’ and civilians’ dialogue here is great: you can often hear them shouting warnings, “Watch out for that hammer!” When the A.I. is actively aware of what’s around them, and they comment on it, it really helps to draw you in to the game.
In the skies above, you can see a massive amount of Covenant aircraft moving in the direction of the Dreadnought. Things are obviously coming to a head.
A squad of Grunts and Jackals waits around the corner, while a single Brute stands near a hologram pedestal.
“Take heart, my brothers! Only our enemies should fear this raging storm. Darkened skies and lashing fire are all that remains for them when we, the worthy, have passed beyond.” [The Storm, Halo 3]
While, of course, the pedestal only transmits one-way, the Arbiter still makes a response for his own sake:
“I will not be shamed. Not again! Not by you!” [The Storm, Halo 3]
The Chief’s primary enemy is obviously the Prophet of Truth – this is the remaining leader of the alien force that has almost pushed humanity to extinction, the driving force behind the hundreds of battles occurring planet-wide at the moment. For the Arbiter, it is very personal. He has, like all Sangheili, grown up under the leadership of the three Prophets. But, beyond that, he has had very personal interactions with this particular Prophet. After the Council declared the Arbiter a traitor and sentenced him to death, the Prophet of Truth, along with Mercy, “rescued” him by allowing him to become the Arbiter. But the Prophets betrayed him. While the Elites at High Charity were removed from their positions as Honor Guard, the Arbiter was simultaneously betrayed by Tartarus, acting on the Truth’s orders; orders which Tartarus did not hesitate to speak of to the Arbiter.
Defying death, the Arbiter not only escaped the clutches of Tartarus, the Gravemind, and Halo, but he has now made it to Earth, and he is determined to have his revenge on the Prophet of Truth.
Rounding the final corner, you can see the enemy anti-air gun that you’ve been fighting this entire time to reach.
It fires, and a moment later, a Longsword fighter crashes to the ground. The UNSC theme begins to play as you make your way into the area. A sniper is available on the left, and you’ll probably need it. Lots of Brutes are waiting at the top of the hill, including a Chieftain with a Fuel Rod Cannon. Banshees are also circling in the sky, and they’ll definitely attack you if you move into their lines of sight. After you clear out all of the enemies, you have to physically take down the anti-air gun, which is a nice touch; I guess Bungie learned from the Halo 2 Scarab encounter.
Something about this encounter just works. I don’t know if it’s the classic, “take the high ground” mechanic, or the music playing behind everything, or the epic scenery in the distance; the combination of all of these things, as well as Miranda’s “Chief! Hood’s ships are closing fast! Destroy that gun – we’re out of time,” all add up to an epic encounter, and one befitting the cutscene that follows thereafter.
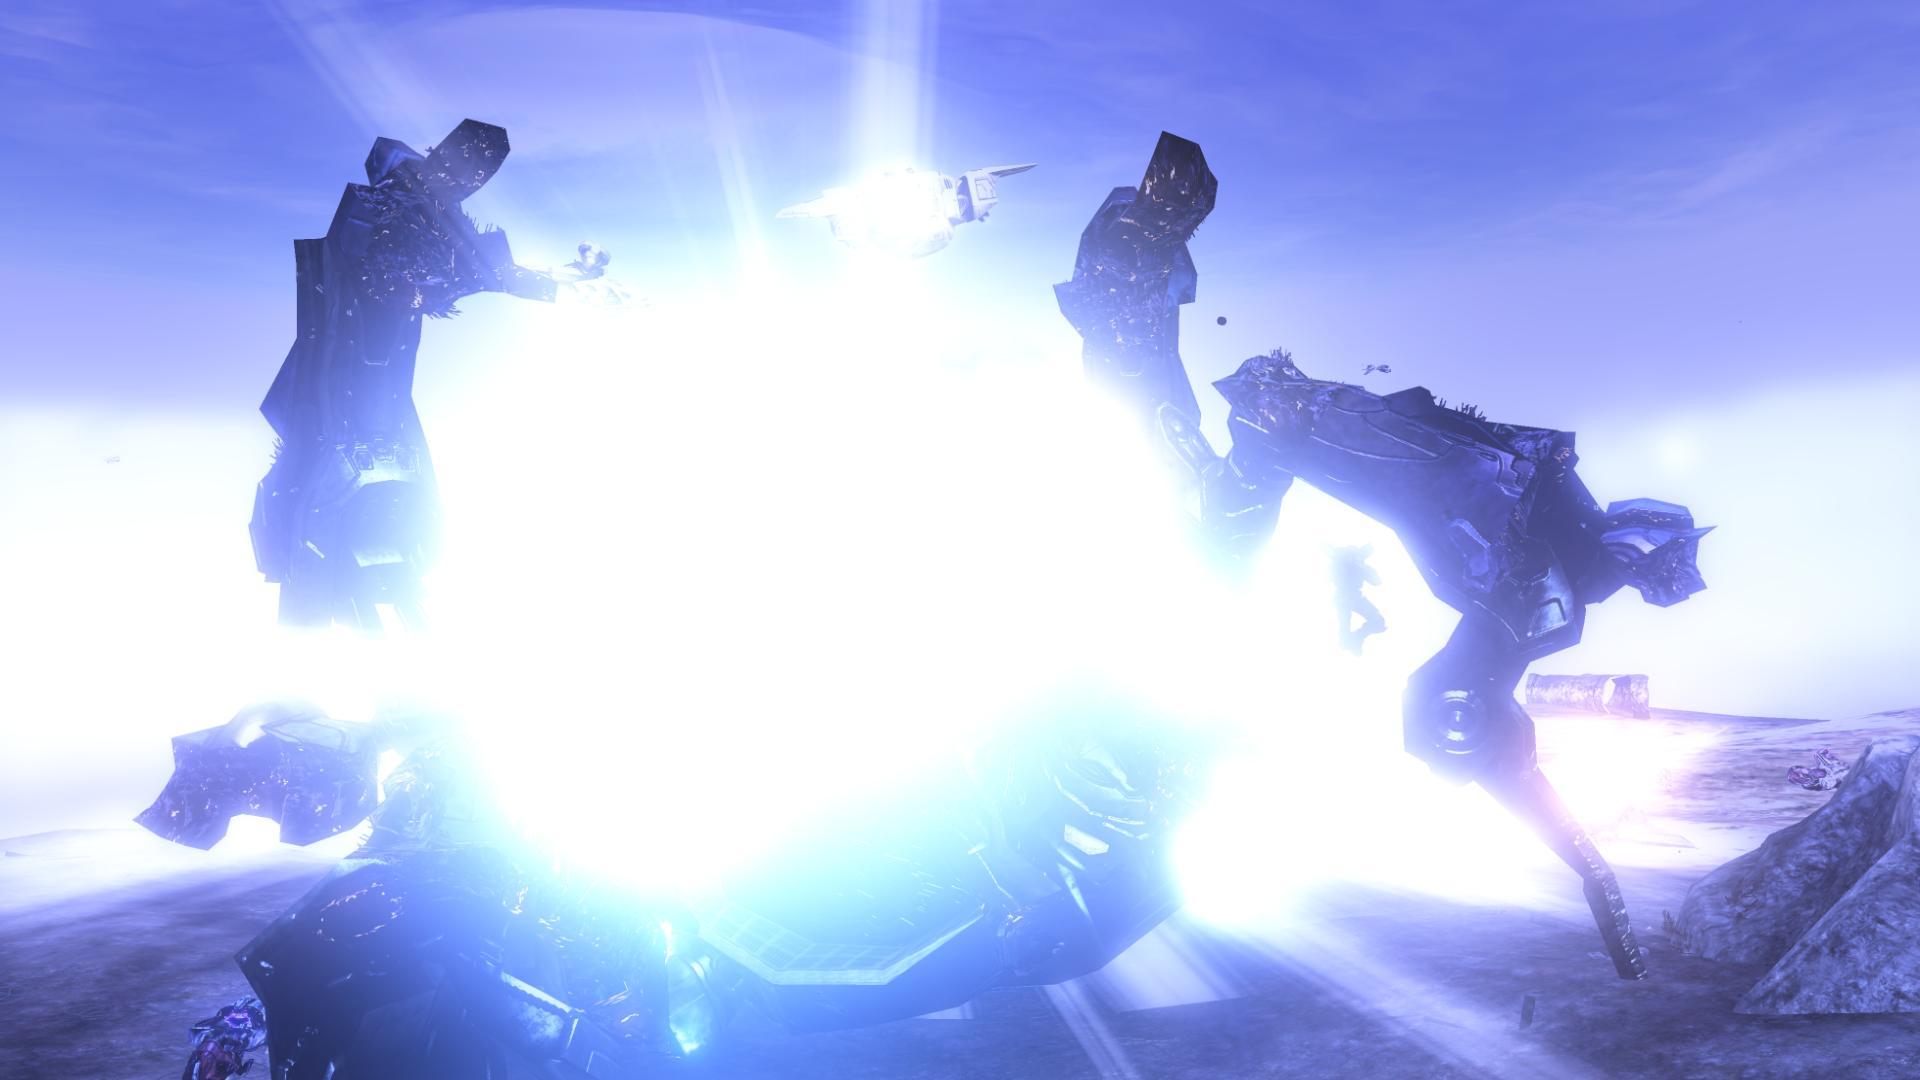
After the anti-air gun is destroyed, the music from Halo 3’s announcement trailer begins to play. The Chief, who isn’t the star of this next scene, watches alongside the Arbiter as Lord Hood’s attack force begins their bombing run, complete with UNSC frigates firing directly at the Dreadnought.
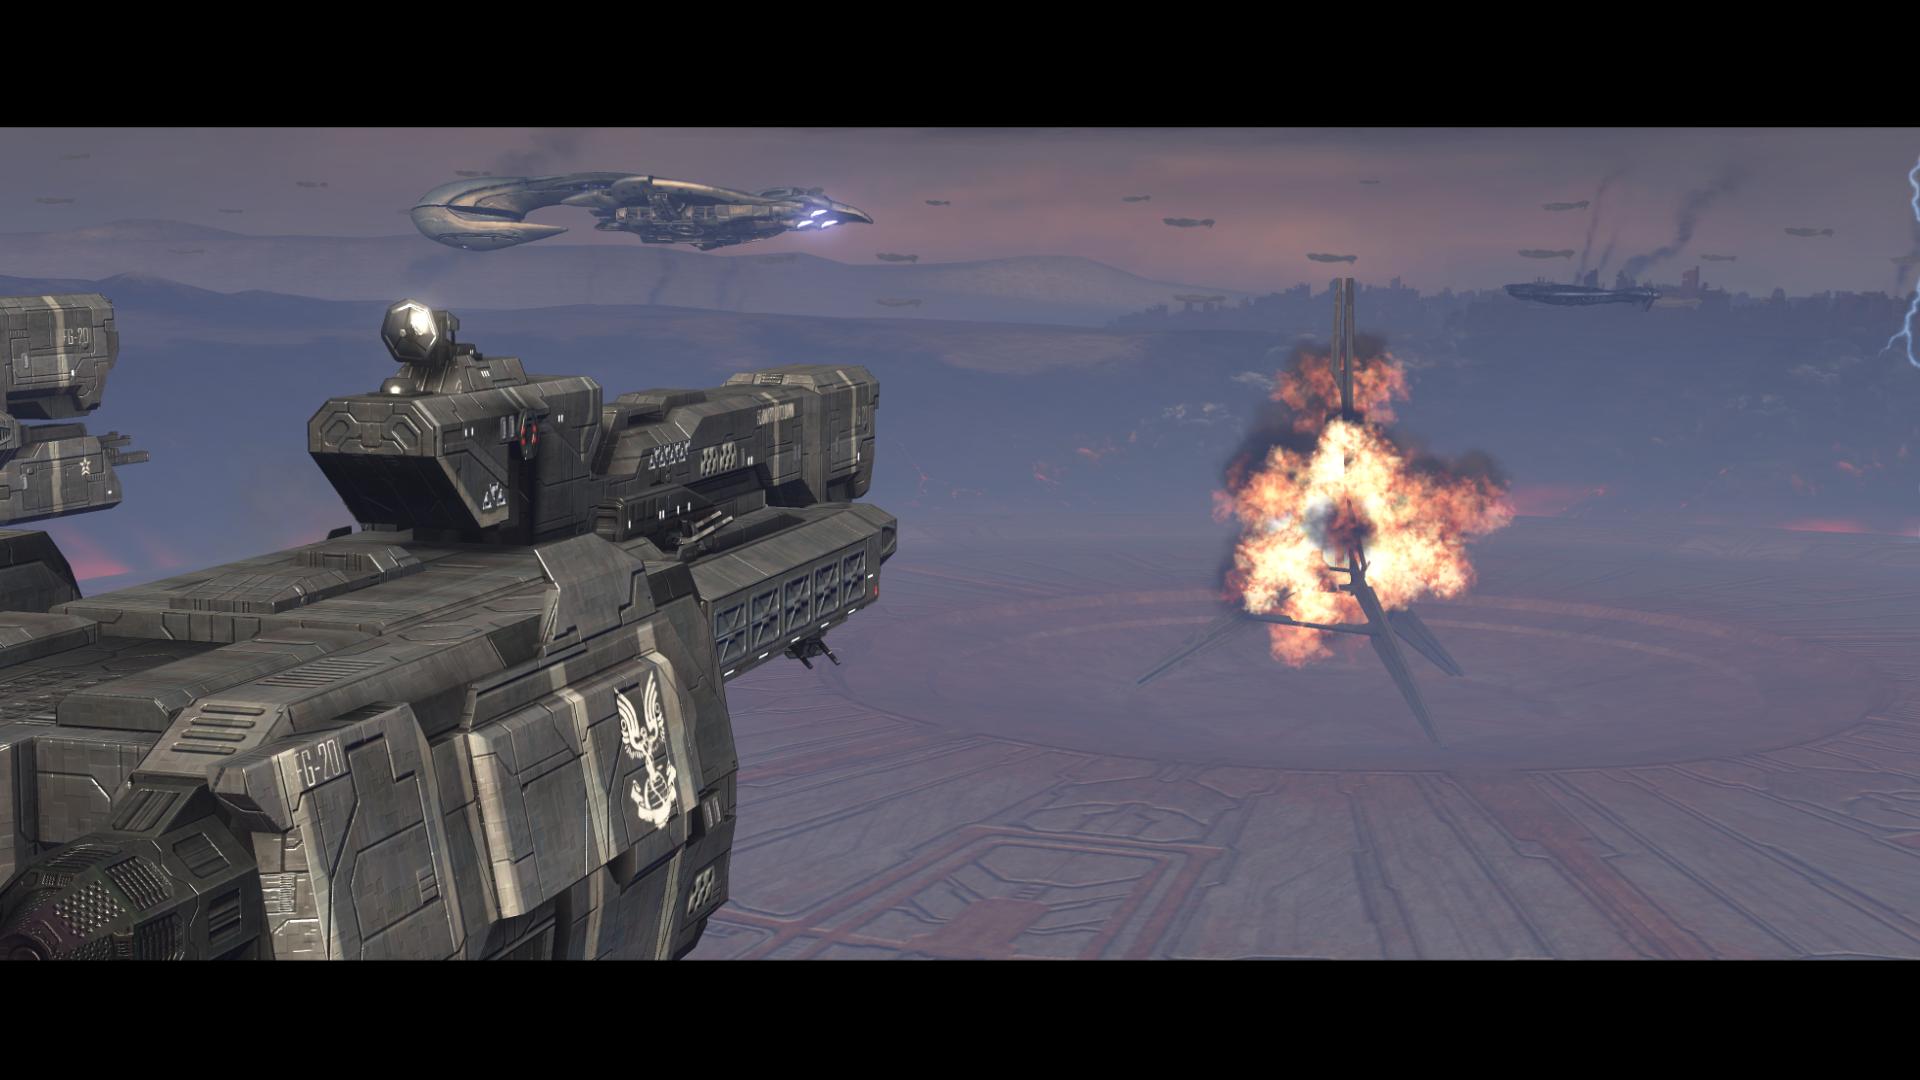
But, apparently, it is too late. Despite what seems like an overpowering force, the Dreadnought lowers into the ground as the massive Forerunner structure begins some sort of movement, a massive energy beam lancing into the sky. Like in the announcement trailer, a blinding light flashes and an unseen force knocks the Chief and the Arbiter to the ground. Cortana speaks:
“This is the way the world ends.” [The Storm, Halo 3]
While this line is from the announcement trailer, it actually goes much further back. In February of 1999, before the world even knew what Halo was, Bungie began sending out cryptic messages to their community – these messages would come to be known as “the Cortana Letters.” At the time, the community tried to connect the letters to one of Bungie’s past creations, Marathon. The portion of the text that we are interested in right now reads:
“Oh, and your poet Eliot had it all wrong:
THIS is the way the world ends.” [The Cortana Letters, Bungie]
Bringing things full circle, indeed. Cortana, who went by that name even then, spoke of the end of the world, an end which may now possibly be upon humanity, despite the Sangheili’s, the Chief’s, and the UNSC’s best efforts.
Rather than the eventful trumpets that we have been used to hearing after Cortana’s line, we can hear only a tune of mournful strings, and a howling wind. It is at this very moment that we finally reach, and pass, the events that we knew of before Halo 3’s launch.
“What did Truth just do? (coughs) Did he activate the rings?”
“No, sir. But he certainly did something.” [The Storm, Halo 3]
The Arbiter, evidently angered by Truth’s apparent success, lets out a savage roar. The Chief watches as a half-dozen Covenant cruisers push into the massive sphere that has just formed in the sky.
“Evac wounded and regroup. Wherever Truth went-”
“Sir, new contact slipping in.” [The Storm, Halo 3}
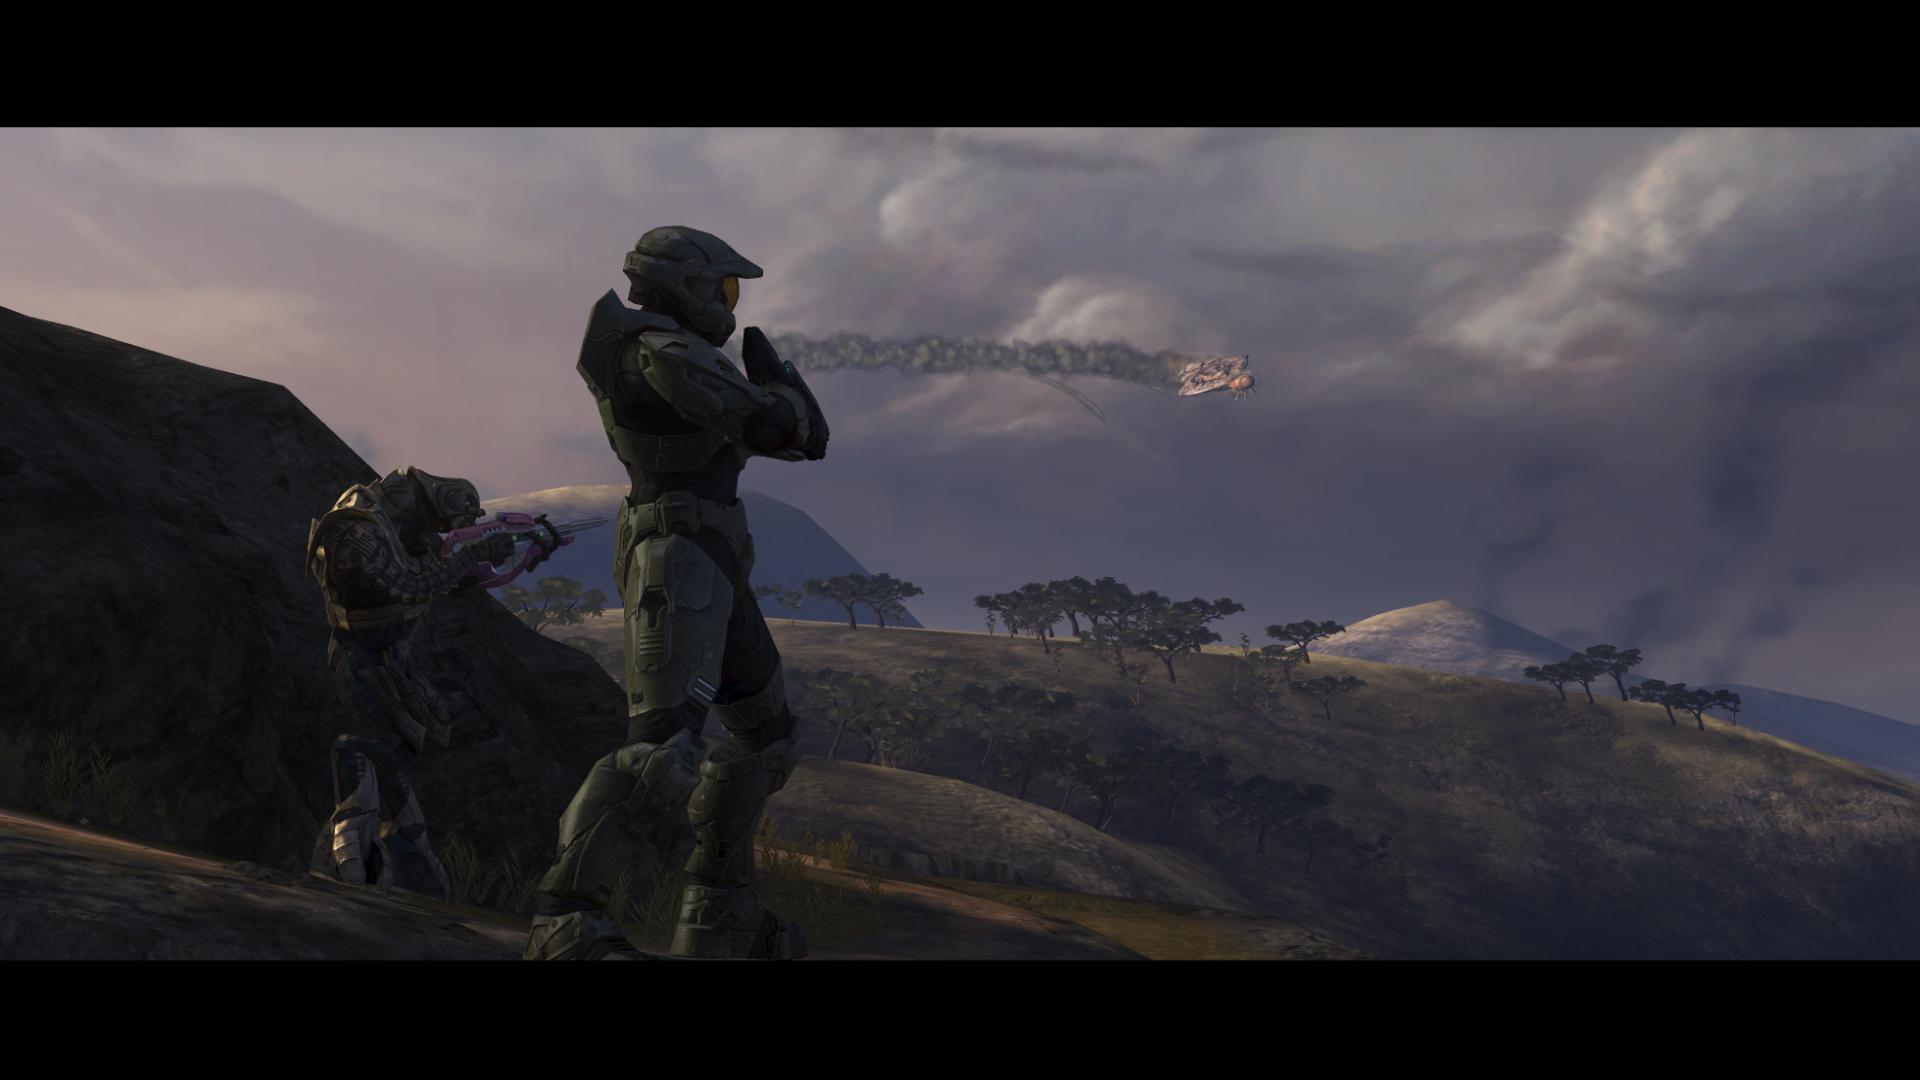
A Slipspace portal opens in the sky and the ship that was spoken of earlier, on the Marine’s radio, emerges. For those familiar with the series, it is immediately obvious what this is: trailing brown smoke and covered in decaying organic matter, this ship is not Covenant – it is an obvious carrier of the parasite. Immediately, our attention is taken from the massive portal in the sky and Truth’s apparent success. The enormous once-Covenant cruiser flies overhead and crashes in the distance, the sky once again lighting up.
“What is it? More Brutes?”
“Worse.” [The Storm, Halo 3]
For most, the realization sets in:
We are not in the Library.
We are not in the iced-over canyons of a Halo ringworld.
This is Earth.
The Flood are here.
love the ending, it really can freak you out.
The Flood? Earth?…. damn
Comment by Devin — August 20, 2008 @ 2:27 pm
For the first part I get all the Marines on Ghosts to cover me. It’s a lot easier that way.
Comment by Xij29y6 — November 14, 2008 @ 1:36 pm
The poster with “Sheik” on it is not spelled wrong, as that is how the nickname was spelled for that particular person.
Comment by DRST13497A — November 14, 2008 @ 10:56 pm
I actually got goosebumps at the end of that. Great job.
Comment by Rogue Cheddar — November 17, 2008 @ 3:24 am
Good job. Now if only you could finally make the hindsight for Halo.
Comment by Christian Bethel — November 24, 2008 @ 7:11 pm
Alternate strategy for taking down that pesky Scarab:
There’s flipped Troophog in the area with the first AA Wraith. After you’ve cleared the area, grab it and drive it into the next building, and park it out of harm’s way. Clear the room. Kill the drones. And keep those marines alive. Take rocket launchers off the rack and give them to the Marines and have them get in the ‘hog. Then, move on to the parked Mongooses and do the same thing until your ‘Hog is filled with four rocket launcher wielding marines! Can you say “Ownage!!!”?
Comment by Squirrel Shape — December 22, 2008 @ 9:47 pm
I was actually kind of shocked when the Hunters walked in and I realized I had to fight them. I thought Halo 2 ended with them fighting the Brutes alongside the Arbiter. I was pretty stoked at the thought of having them on our side for once. I wonder if this is just a plot error on Bungie’s part or if they are ever going to explain that.
Comment by Devium — December 29, 2008 @ 4:05 am
i must say, the UNSC ships converging on the dreadnought and the scarab having AI were some of the things that really shows what the 360 could do. i mean, assuming the cruisers are using the same model as the Dawn in the ark, you have 3 or 4 massive objects moving and spewing out particles, and the massive scarab we all know and despise moving of it’s own accord. The original xbox with it’s pentium iii and 128mb of RAM would’ve been a pile of glop unrecognizable as a game console if it had to process that.
Comment by Poopskintheliar — March 8, 2009 @ 12:22 am
Pretty good information. I’ll be looking for the weapons I didn’t know about ’til now.
Once you’ve reached the point with the Scarab, you can take it out pretty easily with the stationary missile pods up on the catwalk. If you’re quick enough and aim carefully, you can take the whole thing down by blasting a leg and then destroying the armor guarding the power core (much like you can do with a tank or a Hornet later on on the Ark). Even I have done it in under twenty seconds before, so it can’t be too hard, and it’s make a great clip anyway. Additionally, if you’re willing to detach and carry one of the pods into the building, you can kill the Hunters and the Chieftain with one rocket each, provided you save its rockets. It’s always fun to crush the big baddies with overwhelming force. If you want, you can even use the remaining rockets to take out a few of the Banshees darting about, just because you can.
@Devium: Maybe the Hunters fought with whichever commanders they served under when things got ugly. Then it would make some sense for Bungie to omit allied Hunters (and/or Grunts, etc.) to reduce confusion and friendly fire in-game. It would suck to target and destroy what seem to be enemies only to have your allied AIs shout, “He’s crazy! Get him!” and mow you down for no clear reason, especially if you were new to the game.
Comment by TheAsterisk! — April 5, 2009 @ 3:01 am
you know you can kill the Scarab with the missile pod, right?
Comment by Chistian Bethel — April 22, 2009 @ 3:00 pm
Yes? I thought I said just that…
It must be a common Internet disorder that no one reads the posts preceding their own.
Comment by TheAsterisk! — April 27, 2009 @ 1:31 am
sorry…..
Comment by Chistian Bethel — April 29, 2009 @ 1:40 pm
does anyone know how to drive the anti-air wraith?
Comment by Chistian Bethel — May 4, 2009 @ 3:06 pm
in reply to comment above yes i do okay so jump on and kill the gunner then hit the door or roof then crouch down and get into a position where it doesnt say pres RB to boars hold RB and shoot the brutes head until he dies if done right you shud get in
Comment by Josh butterballs — June 16, 2009 @ 3:03 am
those traxus workers ARE civilians on page thirty one in the instructions manual on the left , second to last it says civilians. The only civilians you encounter are the traxus workers so all the others are wrong about them being UNSC factory workers. Also on page sixteen it says USNC not UNSC I was going to tell that to bungie but my computer takes ages to load up to bungie.net. Bad bungie. I heard halo 3: ODST is coming out soon. DON’T buy halo wars it sucks.
Josh
P.S good writeup
Comment by Josh butterballs — July 16, 2009 @ 2:45 am
sierra bravo
There are alot more unsc ships, here are just a few of them.
Unsc Circumferance
Unsc Fair Weather
Unsc Merwither LewisIf you want to find out a load more go onto halopedia(sorry if im not aloud to advertise websites).
Also to everyone i think in the final cuscene the light is an EMP, because the ships all like sort of lose power.
Comment by Echo-411 — October 18, 2009 @ 6:02 am
Echo-411, It could be some sort of EMP like you said but I think of it as a sort of Giant power drain which takes all nearby facilities and drains them of power so it could take off. I’m not sure if the power drain or EMP comes off the portal. Might do.
~Josh
Comment by Josh butterballs — December 7, 2009 @ 3:47 am