Seattle in Reign

Admittedly, this was not the first time I had visited the West Coast.
My previous trip to this side of the country took me to Los Angeles, helping write a low-budget film for a friend. But even with that reckless abandon of all responsibility, it was not preceded by anywhere near the anticipation and glee which accompanied my trip just this last weekend. So, after a pair of mechanical failures, two hours sitting in a hot airplane while watching the first half of the psychological horror/romantic comedy known as Fool’s Gold and finally six additional hours of travel, I arrived in downtown Seattle for PAX ’08.

Although there were a handful of other draws, for the most part, I was here for Assembly.
Earlier this year, Frank O’Connor began describing “Purple Reign,” what was at the time depicted as a midsize symmetrical map with walkways and, presumably, the color purple. Some time later, Luke Smith provided further details, hinting at a variety of Covenant-centric aesthetics and charting the map’s revisions.
By the time I arrived on PAX’s exhibit floor, I had no real concrete understanding of what this new map, now called Assembly, would entail. As I write this now in an East Coast-bound airbus of a rickety 737, I struggle to capture the map and all that it held in written words. Suffice it to say, however, it is easily one of the most complex multiplayer maps in all of Halo 3. This should be taken, not as a count against the map at all, but rather as a compliment – as it is also easily one of my favorites thus far.
Fused together by map and mission designer Dan Miller, Assembly is entirely symmetrical and its size falls somewhere in between Halo 2’s Sanctuary/Desolation and the illustrious Pious Inquisitor, better known to fans as Midship. And alongside the latter, there are several very distinctive similarities which exist. Apart from the obvious visual styling which is Covenant in nature, both Midship and Assembly have a round shape with two bases opposite of each other in a bowl-like arena. For both, the remaining environments are composed of strategic walkways, curved ramps, smooth platforms and stunted corridors which make for interesting transitional sections and choke points.
Scarab, In Vitro
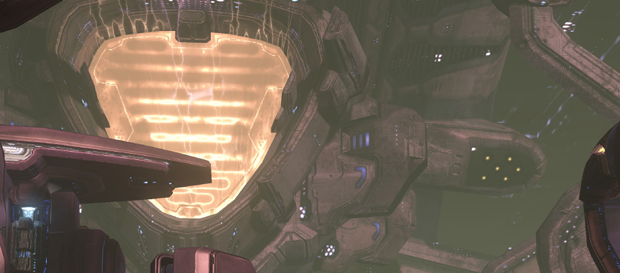
The fiction behind any multiplayer map is arguably one of the most compelling elements for fans of the story and here, Assembly is no slouch. The bulk of the map’s history is found in the dramatic and enormous skybox. The map itself is essentially a platform adjoined to an energy wench with tubes conversely rising from each base upward like serpentine armatures. The traversable area of the map appears to simply be the control station for a conveyor-like assembly line through which Covenant Scarabs are born.
This is only one of two enormous foundry stations which hang far away from the map itself, despite constantly and impressively interacting with it.
The term “born” is intentional here, as we now have canonical validation of the organic comparison between the interior patchwork of the Scarab tanks and the same species which represent the Hunters. Both are simple slug-like creatures with their material embodiment found in the fusion of their biology with Covenant technology. As was depicted by Joseph Staten in Contact Harvest, the Lekgolo were used to clean and maintain the massive Forerunner relic known as the Dreadnought. Here we see that the Covenant felt no different about the care and potency needed to power their walking assault platforms, as various parts of Assembly house the tenuous matter and fluid which make up the Lekgolo.
In this skybox, the Scarab’s carapace emerges from a gargantuan facility into what appears to be the immense bowels of High Charity. Against the brightly lit sea of coolant, the vehicle’s chassis is transported across a familiar looking gravity bridge to a conductor just above the map itself. It is here where the Scarab is first powered, lighting up as though it has been brought to life. It is then carried down the conveyor to the far side of the chasm and into a separate housing facility, presumably to be finished and sent into battle.
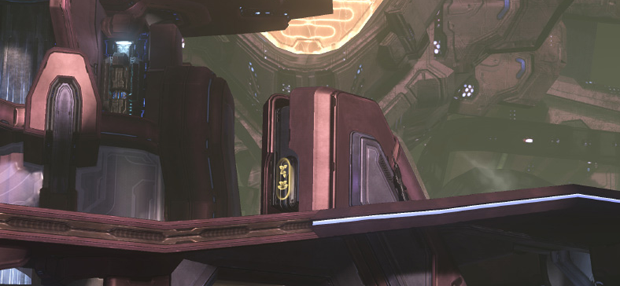
The fiction, of course, doesn’t stop with the skybox or any overhanging and distant geometry. Throughout Assembly, there are various flickering Covenant symbols and surging energy conduits which play into the map’s role witnessed high above. For the quick-eyed fan or two, some may have even spotted a twin dial control station similar to the one we first discovered in Halo: Combat Evolved’s Truth and Reconciliation bridge – clearly the Covenant operator station for this integral part of the assembly line.
The Five
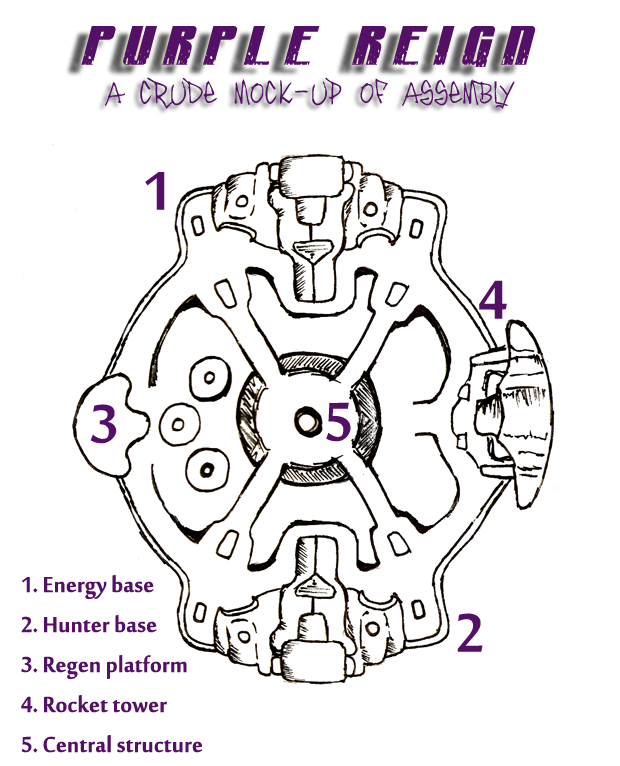
From above, the map looks interestingly like the steering wheel of a slick, feature-heavy Covenant sports car. In written word, however, Assembly is best understood in sections and layers. Essentially, the map has five specific locations which are central to Assembly’s flow and function.
- The central structure
- The “Hunter” base
- The “energy” base
- The regenerator platform
- The rocket tower
Even considering the aforementioned, much of the map’s combat takes place on the walkways which round the periphery and cross the center,often spilling over into Assembly’s basin-like floor.
The Grenade Basket
Although the map was initially planned to be closer in shape to a hill than a bowl, Assembly’s final floor iteration plays extremely well. Rising away from the middle of the map, grenades can be caught against the hourglass-shaped central structure to trap or stall pursuing enemies at specific junctures which run along the floor. Players can also find choke points underneath each of the four individual walkways which cross the basin at the map’s middle tier; rather than freely hanging in the air, the walkways have a structural base with a yellow-tinted window allowing players to see each other from separate sides.

The “basin” has four of these translucent barriers girding the walkways. Almost every match played on this map will use at least one of them for one reason or another.
One theme which is presented right at the start is that of strategic verticality.
This doesn’t just speak to the various advantages of havingthe open high ground against an enemy, which are obviously numerous on Assembly, but also to the ease with which a player can move from the lower levels to those above. Some of these are overt, like the ramp leading up to the rocket tower’s energy lift or the front lip of each base, but others are less obvious, much like the trio of cylindrical generators found adjacent to the regenerator platform.
Hourglass Central
The bright, HDR-effected lights on its exterior contrast wildly with the slightly bluish-hue from the pulsating energy within its folds – the hourglass-shaped architecture at the center of Assembly plays role to a variety of cat and mouse scenarios. At the bottom of this central structure we find the lowest portion of the entire map. Here players can use one of two doorways, found near the front of each base, in an effort to access a gravity hammer. Because these two entryways are offset from the walkways above, it offers keen escape artists a quick out if the top level or connecting walkways get too dangerous. But buyer beware, as the lower level contains a pair of fusion cores buried in its interior walls.
The upper level of the central structure is similar, but with four doorways and the four walkways leading out from the hourglass geometry to the four corners of the map, somewhat similar to Halo 2’s Sanctuary central structure and walkways. At the center of the upper floor, the player will find an active camouflage powerup, shrouded in a new shield door system – a “tube shield” – which seems likely to be Forge-able if it is anything like its older brother. Here, players can drop down the chute to the central structure’s hammer perch without fear of death.
Gruntwalk
Moving out of the structure and along any of the four walkways, players will find a Covenant character-coded piece of geometry rising up like a fin – obviously protection against ranged combat. All of these walkways connect with the perimeter walkway, a round, undulating frame that hugs the exterior of the map, sometimes safely against a wall or base and other times perilously near a vast chasm. Much like Ascension or Lockout in Halo 2, combat will eventually necessitate “rail jumping,” chancing death for some measure of tactical advantage.
These fin-like console stations might have been used to communicate information to the Covenant maintenance team in charge of this structure; you’ll be using them to stay alive.
The Veranda (Hold the Pepper)
The most dangerous of the five areas, however, is the regenerator platform, a flat pedestal-like precipice, coated in a cascade of unnatural light which undauntedly stares outward at the giant skybox. Players can find some cover below, but this is easily the least protected section of the map, hence the necessity for a regenerator.

The regenerator is atop this platform and overlooks an ocean of coolant.
Castle Colluder
Opposite this half of the map and buried in a shadow cast by the massive wench is the rocket tower. At its lowest point, a corridor on the rim of the basin allows access to the gravity lift which shoots players to the top of the tower, a crested rampart where the rocket launcher actually lies. A ramp rises from the lower level, splitting in half and surrounding the exterior of the tower, a belying glass-facade which shows the lift, but gives no immediate access to it. Intuitive players, however, will locate the rear entrances on the sides of the tower, leading to an artifice pathway and eventually, the same elevated perch. Climbing the tower isn’t without any risk, though, as a pair of fusion cores are nestled against the back of the parapet and a single bullet could be the difference between rocket control and waiting to respawn.
All Your Base
Of course, this brings us inevitably to Assembly’s pair of bases; one bears the cool, sterilization of blue steel and energy while the other has the rancid orange-colored tendrils which are clearly of Lekgolo origin. For the most part, the base architecture for each is identical. Both are a very unique take on the interior and exterior design which forces movement while still rewarding the ability of a player to hold a key strategic position.
For example, the base’s interior is a stunted latticework of short corridors and walls with rear access to lower levels (the basin) and back up with a short lift toward the front of the base. Obviously, the base’s close quarters make it extremely dangerous when grenades find their way in, but holding the fort isn’t without some measure of strategic advantage. Directly at the front of the base interior are two one-sided glass windows which stare out across the map, allowing defenders the advantage of enemy tracking while the battle plays out. This operates in tandem with a pair of ramparts, one on each side of both bases, each toting a fin-like piece of cover which somewhat resembles those on the walkways.

The bases’ multiple levels and narrow corridors may take some getting used to, but they feel remarkably similar to the perimeter corridors on Halo 2’s Colossus.
Purple Piece of Awesome
It is incredibly difficult to fully reign in the intricacy and tactical nature of Purple Reign in approximately 15 matches which could be likened to a random flurry of assault rifle rounds in a free-for-all match against nine wide-eyed, ESRB-ignoring RECON hunters or while picking up one’s jaw off the floor the first few times the Scarab carapace is spotted as it moves along the Covenant’s elegant energy harness. That being said, it seems as though the map will easily suit Team Slayer for 4v4 or 3v3 and both flag/bomb objective gametypes of that count or lower. Competitive players will still prefer battle rifle starts here, as there is plenty of room for ranged combat, but during matchmaking’s assault rifle starts, there will still be opportunities as battle rifles and Covenant carbines instrumentally placed atop each of the four crossing walkways. Despite the map’s size, its mid-level openness require the regenerator, bubble shield and their counter, the power drainer. You’ll also find a mauler or two, an excellent short-range instrument for the basin’s bob-and-weave architecture.
It goes without saying, given the fickle nature of the Halo multiplayer community: Assembly is not everyone’s map. There will likely be people who find issue with the density of cover or the initially disorienting symmetry. However, diametric to other midsize semi- or pure-symmetrical maps in Halo 3, Assembly stands with a very select few which reward players for skill, graceful precision and tactical superiority. It has long lines of sight, non-linear compartmentalization and plenty of opportunities which reward risk when properly executed rather than excusing folly through chance and circumstance.

The huddled masses crowd around to see and experience Bungie’s newest map.
There’s no telling how many maps we have left in Halo 3, but if this map is any indication of the direction multiplayer designers are taking the game’s downloadable content, we can rest assured that our future will be a bright one indeed. If Assembly proves anything to me which other small-to-midsize maps in Halo 3 have yet to, it is that competitive infantry multiplayer is still alive and well, rising from the ashes of Halo 2’s Midship, Ivory Tower and Sanctuary. Hopefully this trend continues.
It should also be noted that Bungie was in its own league at PAX this year. Not another single publisher or developer had the same amount of hands on staff, nor the same amount of diehard fans consistently queued up and ready to play or watch others play – and all this for a mere map. Much thanks should be allotted to those faithful Bungie employees who forfeited their weekends to prove to everyone that their renowned signature is 100% accurate…
They do love us.
Note: Below is a crude scrawling of Assembly (by yours truly) based on my memory when playing and a handful of screenshots. Although most of it is accurate, I cannot completely attest to its veracity or scale. Hopefully it does its part to convey to our readers the general layout and shape of this new multiplayer map.
This is very accurate and descriptive even after a short amount of time playing it.
Good job.
Comment by Yukob — September 4, 2008 @ 12:41 am
I can’t wait for this map. My only hope is that it fills the gap in the mid-size map department and that it is well suited for MLG. They need a map like Midship (which this seems to be a bit like).
Comment by Fastforward — September 4, 2008 @ 2:25 am
Thanks for the writeup, Mr V.
Excellent job.
Comment by Schultz — September 4, 2008 @ 3:53 am
Good right up voc, I can’t wait to play it
Comment by Hopdaddy — September 4, 2008 @ 4:23 am
That top down view makes the map make so much more sense. Thanks
Comment by Scott — September 4, 2008 @ 7:45 am
man i wish you could drive a scarab
Comment by deathless — September 4, 2008 @ 9:05 am
Great write-up.
Why can’t Bungie give us info like this?
Comment by XMixMasterX — September 4, 2008 @ 9:39 am
Great writeup, vociferous! Thank you for putting this together for everyone who couldn’t make it to PAX. And I agree with Scott, it makes a lot more sense with an overhead view attached. Armed with this new perspective, I think I’ll go back and re-watch some of those shakycams… 🙂
Comment by Beorn — September 4, 2008 @ 10:39 am
You sir, are my hero of the day. I can now picture the size and link the various screenshots of the map together clearly in my head.
Thank you.
Comment by Feather — September 4, 2008 @ 11:16 am
That is a quality drawing; especially for being drawn on a turbulent plane.
Comment by louiswuenator — September 4, 2008 @ 12:00 pm
Most, Most Excellent this site is truly a bright light in the durge of superficial tat that normaly ocupies the inter tubes, Thank You.
Comment by Russell — September 4, 2008 @ 1:38 pm
I am litterally drooling 😛 Excellent report mate.
Comment by KrAzY WiSh — September 4, 2008 @ 6:09 pm
very nice work, but how did you get those screenshots, did bungie give them to you at pax? or did they let you take screenshots yourself?
Comment by CJ FireFox — September 4, 2008 @ 6:47 pm
The screenshots were released on Bungie.net last Friday.
Comment by Cocopjojo — September 4, 2008 @ 7:14 pm
Very good descriptions. I can’t wait. Excellant job!
Comment by Sten4sw — September 4, 2008 @ 7:54 pm
Wow.
Comment by Arachnidus — September 4, 2008 @ 9:57 pm
That looks like it’s going to be so awesome! Lesson learned, you gotta love Bungie for not only their awesome maps and games, but their manner in which they pursue their fanbase and regulate the distribution of the top news.
Love Bungie.
Comment by YahwehFreak4vr — September 5, 2008 @ 12:56 pm
You’re right on. Couldn’t have said it better myself. -Pete
Comment by Pete Jones — September 6, 2008 @ 11:46 am
Accessability is so important for mid sized maps like this. I really appreciate the layout. I have a feeling the names ‘energy’ and ‘hunter’ base are gonna stick ;).
Comment by o0oENDERo0o — September 6, 2008 @ 6:42 pm
IT LOOKS SUPER CRAZY AWESOME!!!!!!!!LOLOLOLOLLOLOLOOLOLOLOOLOLLOLOLOLOLOLLOOLOLOLLOLLLLOL
Comment by SFF — September 10, 2008 @ 6:52 pm
I love the cover image, reminds me of BioShock for some reason.
Comment by EldritchWarlord — September 11, 2008 @ 10:46 am
Freakin awesome. How did you get all the pics?
Comment by Aussie's Poison — September 15, 2008 @ 11:43 pm
Thank you for the info. Well written, easy to understand, and has enough descriptive info to get me PUMPED for this new map!!! Go Bungie!!!!!!
Comment by Jgranga171 — September 16, 2008 @ 2:35 pm